
⏰ How To Make Clock For School Project
Building a clock is one of those classic school projects that combines math, art, and a little bit of engineering.
I remember helping my younger brother build a solar system clock for his fifth-grade science fair, and it was the only project that the teachers kept asking to see again.
This guide will show you how to build a fully functional clock that looks professional and helps you understand how timekeeping works.

Quick Overview
Before you start cutting and gluing, it is helpful to see the big picture of what this project involves.
- Time needed: 2 to 3 hours (plus drying time for paint)
- Difficulty: Beginner
- What you’ll need: Thick cardboard or foam board, a quartz clock movement kit, markers, a compass, and a ruler.
Step-by-Step Instructions
Step 1: Choose Your Project Theme
Decide on a theme before you buy any supplies or cut your materials.
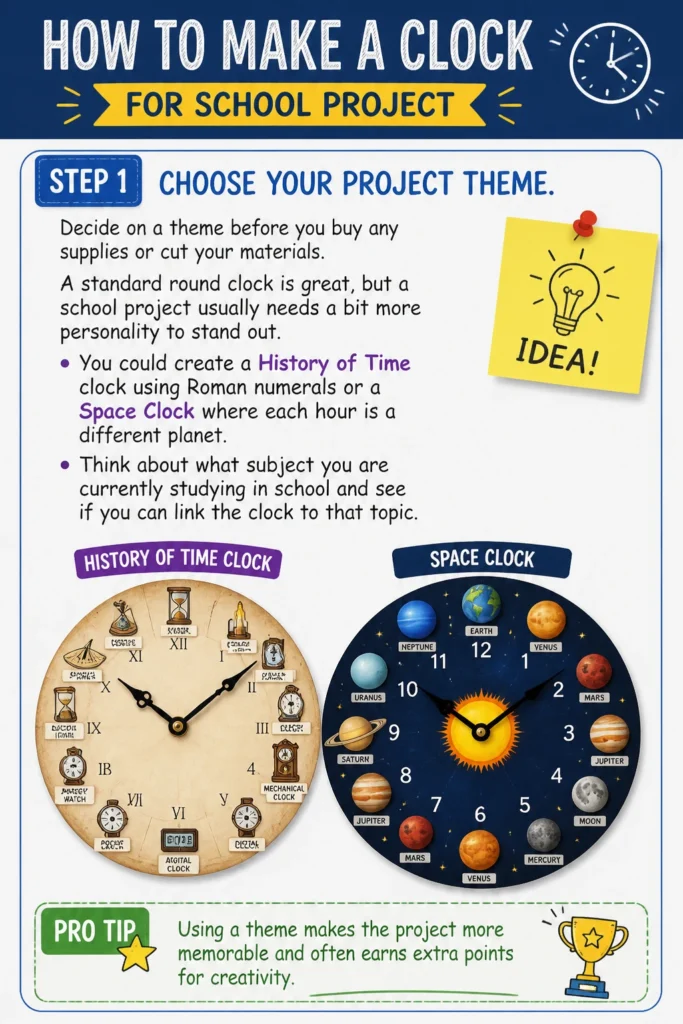
A standard round clock is great, but a school project usually needs a bit more personality to stand out.
You could create a “History of Time” clock using Roman numerals or a “Space Clock” where each hour is a different planet.
Think about what subject you are currently studying in school and see if you can link the clock to that topic.
Pro Tip: Using a theme makes the project more memorable and often earns extra points for creativity.
Step 2: Gather Your Core Materials
Collect everything you need so you don’t have to stop in the middle of the project.
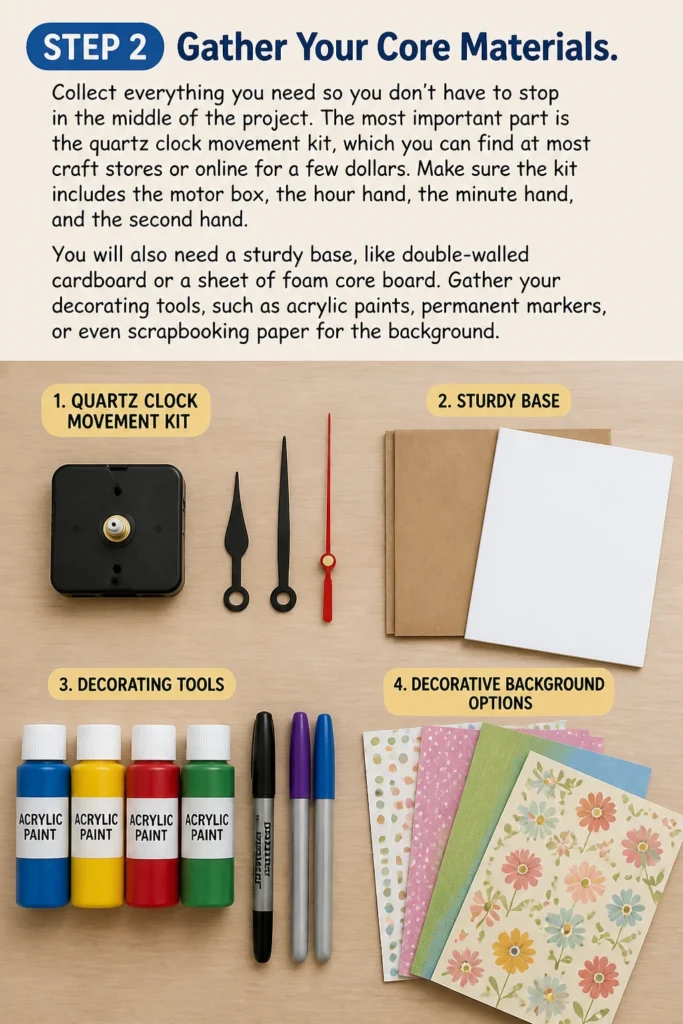
The most important part is the quartz clock movement kit, which you can find at most craft stores or online for a few dollars.
Make sure the kit includes the motor box, the hour hand, the minute hand, and the second hand.
You will also need a sturdy base, like double-walled cardboard or a sheet of foam core board.
Gather your decorating tools, such as acrylic paints, permanent markers, or even scrapbooking paper for the background.
Step 3: Measure and Cut the Base
Draw the shape of your clock onto your cardboard or foam board using a pencil.
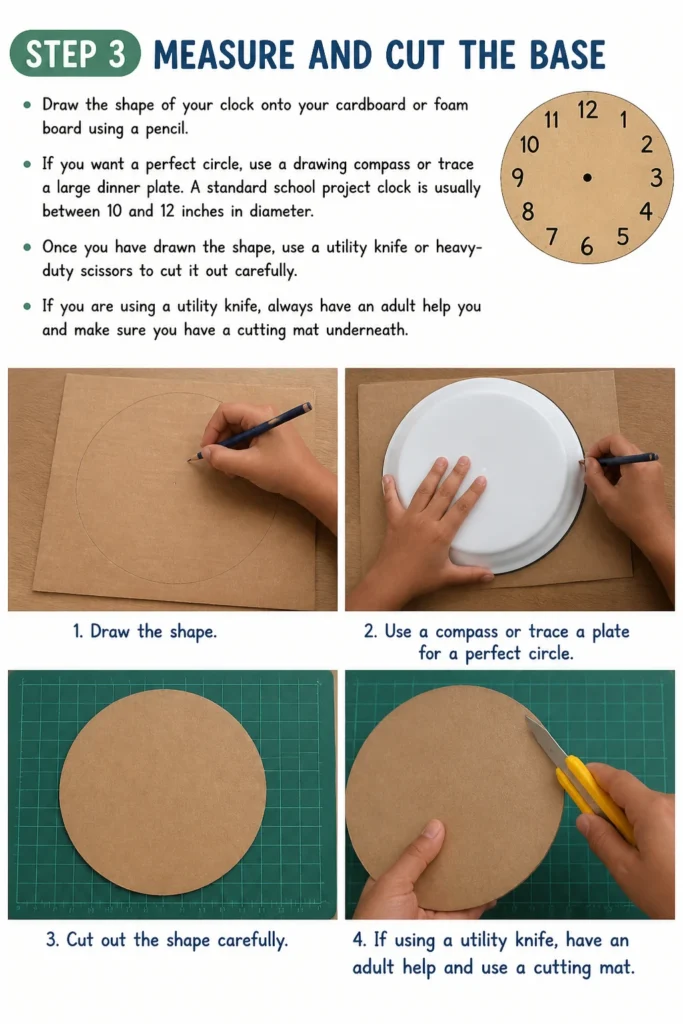
If you want a perfect circle, use a drawing compass or trace a large dinner plate.
A standard school project clock is usually between 10 and 12 inches in diameter.
Once you have drawn the shape, use a utility knife or heavy-duty scissors to cut it out carefully.
If you are using a utility knife, always have an adult help you and make sure you have a cutting mat underneath.
Step 4: Find the Exact Center
Locate the dead center of your clock face, as this is where the motor will sit.
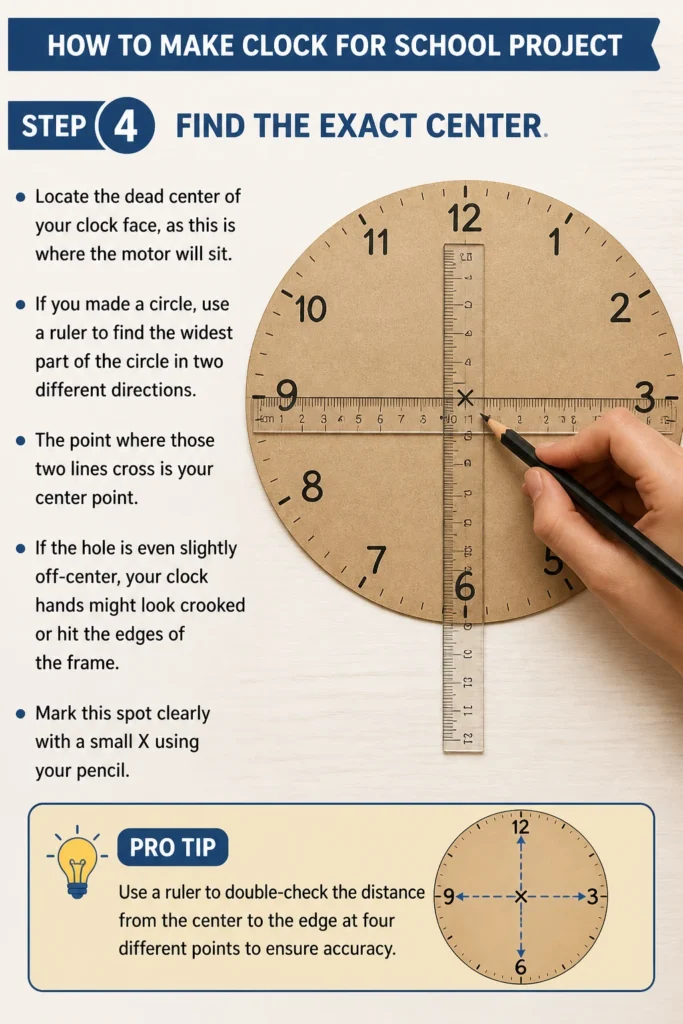
If you made a circle, use a ruler to find the widest part of the circle in two different directions.
The point where those two lines cross is your center point.
If the hole is even slightly off-center, your clock hands might look crooked or hit the edges of the frame.
Mark this spot clearly with a small “X” using your pencil.
Pro Tip: Use a ruler to double-check the distance from the center to the edge at four different points to ensure accuracy.
Step 5: Create the Shaft Hole
Puncture a hole through the center mark you just made.
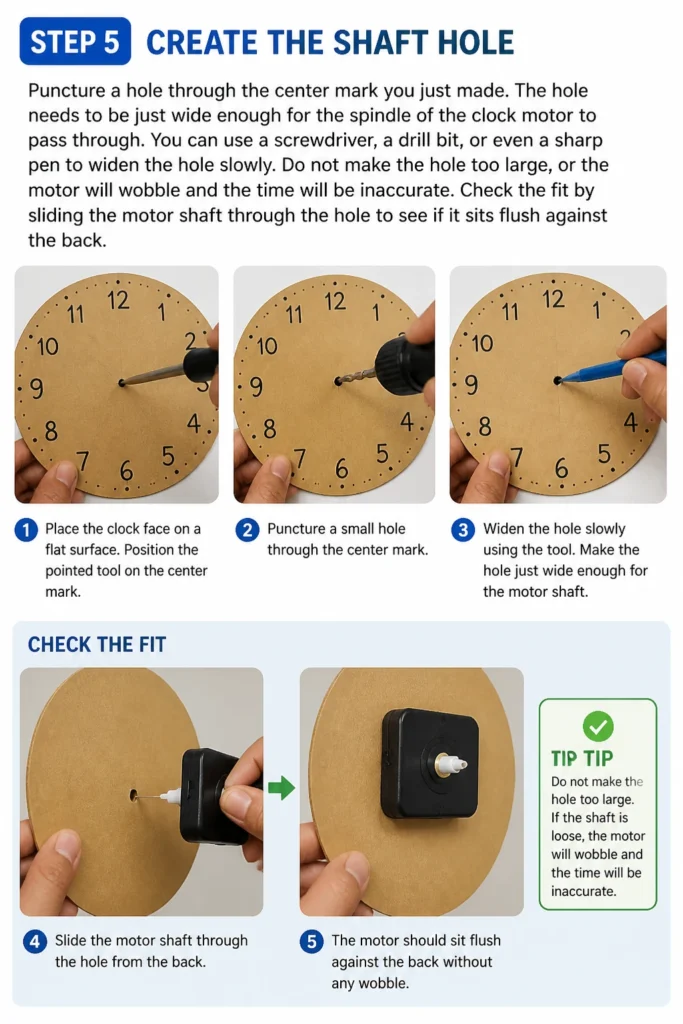
The hole needs to be just wide enough for the spindle of the clock motor to pass through.
You can use a screwdriver, a drill bit, or even a sharp pen to widen the hole slowly.
Do not make the hole too large, or the motor will wobble and the time will be inaccurate.
Check the fit by sliding the motor shaft through the hole to see if it sits flush against the back.
Step 6: Design and Map the Numbers
Mark the positions for the numbers 12, 3, 6, and 9 first.
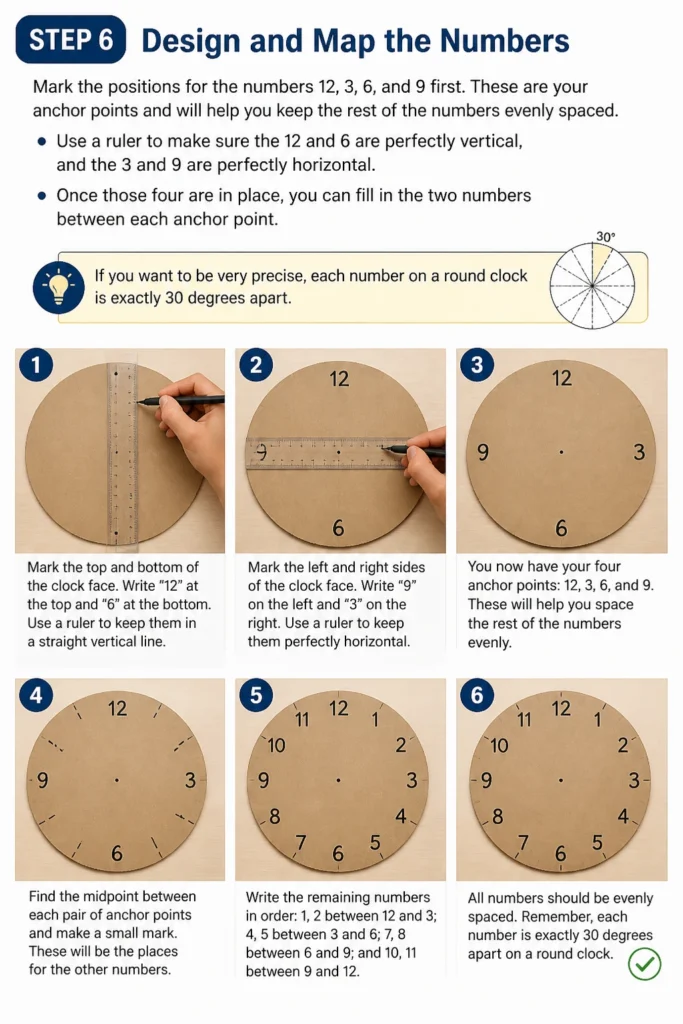
These are your “anchor” points and will help you keep the rest of the numbers evenly spaced.
Use a ruler to make sure the 12 and 6 are perfectly vertical, and the 3 and 9 are perfectly horizontal.
Once those four are in place, you can fill in the two numbers between each anchor point.
If you want to be very precise, each number on a round clock is exactly 30 degrees apart.
Step 7: Decorate the Clock Face
Apply your paint, markers, or stickers to the clock face now, before the hands are attached.
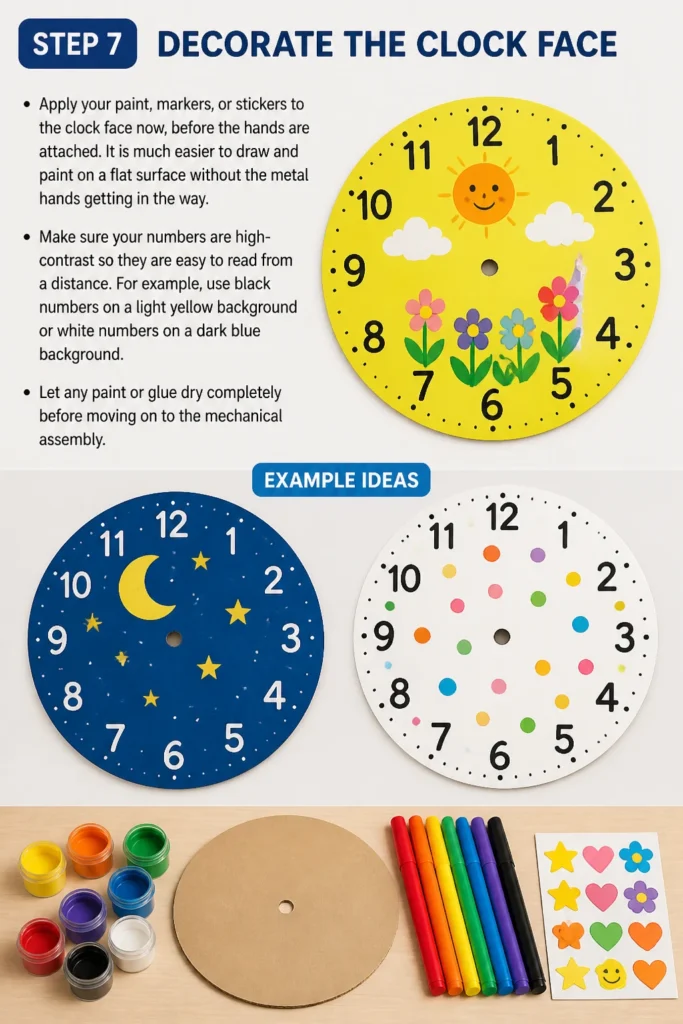
It is much easier to draw and paint on a flat surface without the metal hands getting in the way.
Make sure your numbers are high-contrast so they are easy to read from a distance.
For example, use black numbers on a light yellow background or white numbers on a dark blue background.
Let any paint or glue dry completely before moving on to the mechanical assembly.
Step 8: Install the Clock Movement
Insert the motor box from the back of the cardboard so the spindle sticks out through the front.
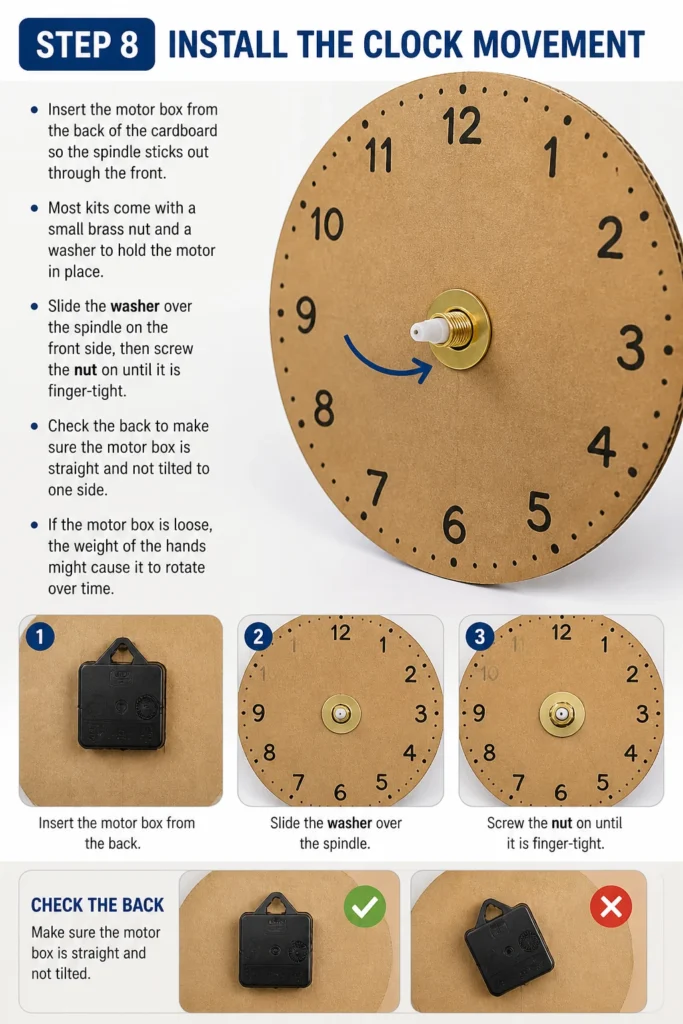
Most kits come with a small brass nut and a washer to hold the motor in place.
Slide the washer over the spindle on the front side, then screw the nut on until it is finger-tight.
Check the back to make sure the motor box is straight and not tilted to one side.
If the motor box is loose, the weight of the hands might cause it to rotate over time.
Step 9: Attach the Hands
Press the hands onto the spindle in the specific order required by your kit.
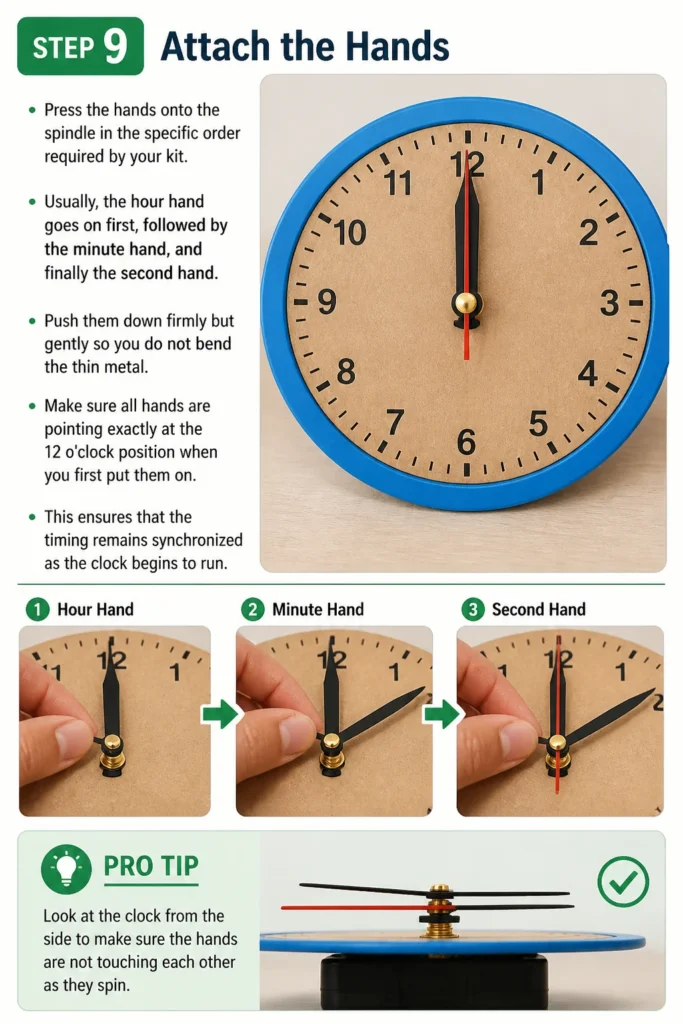
Usually, the hour hand goes on first, followed by the minute hand, and finally the second hand.
Push them down firmly but gently so you do not bend the thin metal.
Make sure all hands are pointing exactly at the 12 o’clock position when you first put them on.
This ensures that the timing remains synchronized as the clock begins to run.
Pro Tip: Look at the clock from the side to make sure the hands are not touching each other as they spin.
Step 10: Insert the Battery and Test
Place a fresh battery into the back of the motor and watch the second hand.
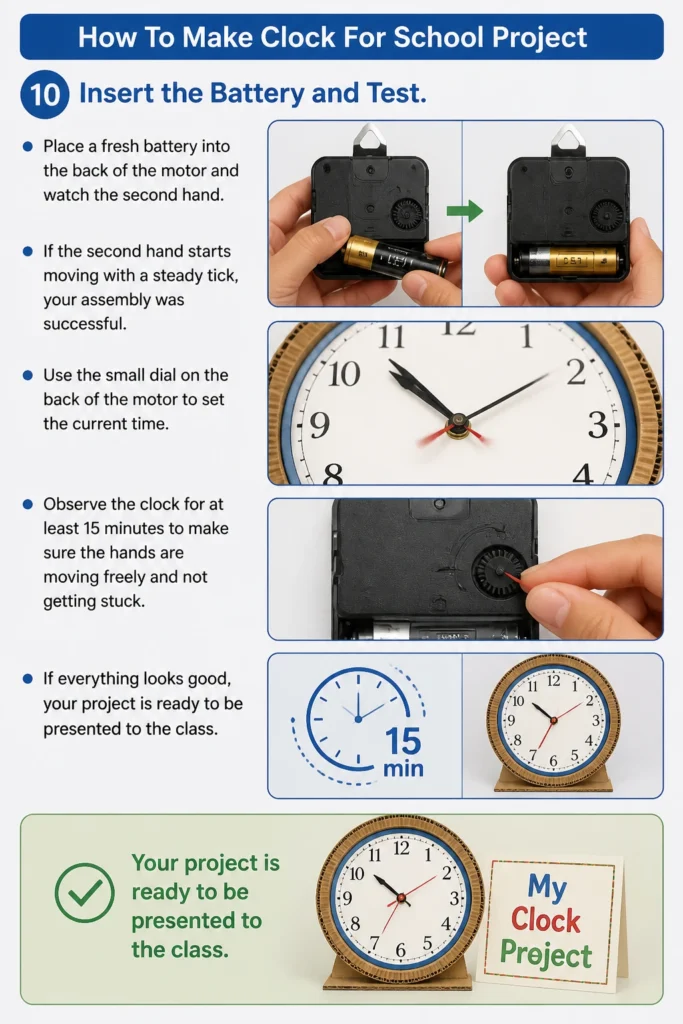
If the second hand starts moving with a steady “tick,” your assembly was successful.
Use the small dial on the back of the motor to set the current time.
Observe the clock for at least 15 minutes to make sure the hands are moving freely and not getting stuck.
If everything looks good, your project is ready to be presented to the class.
Common Mistakes to Avoid
Using Cardboard That Is Too Thick
If your cardboard is thicker than the spindle of the clock motor, you won’t be able to screw the nut on.
The spindle needs to stick out at least a few millimeters past the front of the clock face.
If you realize your material is too thick, you can carve out a small “well” in the back of the cardboard to let the motor sit deeper.
Poor Number Spacing
Many students start writing numbers from 1 and end up with a huge gap between 11 and 12.
This happens because they didn’t map out the 12, 3, 6, and 9 positions first.
Always use a pencil to lightly mark your spots before committing with a permanent marker or paint.
Bent Clock Hands
Clock hands are often made of very thin aluminum that bends if you look at it too hard.
If the hands are even slightly curved, they will catch on each other as they pass.
If this happens, the motor will stop, or the clock will lose time throughout the day.
Check the clearance between the hands frequently during the final assembly stage.
Troubleshooting
The Clock Ticks But The Hands Don’t Move
This usually means the hands are not pressed onto the spindle tightly enough.
The motor is spinning the shaft, but the hand is just slipping around it instead of moving with it.
Gently remove the hands and press them back on, making sure they feel “locked” into the grooves of the spindle.
The Second Hand Is Stuck On The Minute Hand
This is a very common physical obstruction issue caused by the hands being too close together.
Gently bend the second hand slightly upward or the minute hand slightly downward.
Make sure you do this near the center of the clock to avoid creating a permanent kink in the metal.
The Clock Is Losing Time
If your clock was right an hour ago but is now five minutes slow, the battery might be weak.
Always use a brand-new alkaline battery for a school project to ensure it lasts through the presentation.
Another cause could be friction if the hole you cut is rubbing against the spindle.
Key Takeaways
- Start with a theme to make your project more engaging and educational for your audience.
- Use a compass to find the exact center of your clock face for balanced hand movement.
- Map your numbers by starting with 12, 3, 6, and 9 to ensure even spacing around the circle.
- Check hand clearance from a side view to prevent the hands from snagging on each other.
- Test the clock for at least an hour before taking it to school to catch any mechanical issues.
Frequently Asked Questions
What kind of battery do most clock kits use?
Almost all standard quartz clock movements run on a single AA battery.
It is best to use a non-rechargeable alkaline battery, as they provide a consistent voltage for the motor.
Avoid using heavy-duty or “super” batteries, as they can sometimes leak if left in the clock for a long time.
Can I make a clock out of a paper plate?
You can certainly use a paper plate for a very simple version, but it might be too flimsy to hold the motor.
The weight of the battery pack on the back will often cause a paper plate to fold or tilt forward.
If you want to use a plate, try gluing two or three plates together to create a more rigid base.
How do I make the clock stand up on a desk?
You can create a simple “kickstand” using a triangle of leftover cardboard glued to the back.
Alternatively, you can lean it against a small wooden easel or use a plate display stand from a craft store.
Make sure your stand doesn’t block the battery compartment so you can still change the battery if needed.
Is it possible to make the clock go backward?
Standard clock motors only spin clockwise, but you can buy special “reverse” motors online.
If you use a reverse motor, you will also need to flip the order of your numbers on the clock face.
This can be a fun “Back to the Future” or “Time Travel” theme for a science project.
Our Top Recommended Finds
- Quartz Clock Movement Kit: Look for a kit with multiple hand styles so you can choose the one that fits your theme.
- Large Circle Compass: A sturdy metal compass will help you draw perfect circles and mark your degrees accurately.
- Acrylic Paint Pens: These are much easier to use than brushes for writing numbers and drawing fine details on your clock face.
Creating A Masterpiece For The Classroom
Building a clock is a rewarding project because it leaves you with a functional tool you can actually use in your room.
Once you have mastered the basic cardboard clock, you can try making one out of unique materials like old vinyl records or wooden planks.
The skills you learned today about measurement, center-points, and mechanical assembly apply to many other types of engineering projects.
Gather your materials today and start sketching out your design so you can turn in a project that really stands out.