❤️ How To Draw A Heart Organ
Learning to draw the human heart organ can feel like a daunting task. Its intricate network of chambers and vessels often intimidates budding artists.
I remember my own struggles to capture its complex form accurately, often ending up with something that looked more like a cartoon valentine than a vital organ. This guide distills years of artistic practice and anatomical study into an accessible format, helping you create a realistic depiction.
You’ll gain the confidence and skills to render this incredible organ with precision and understanding.
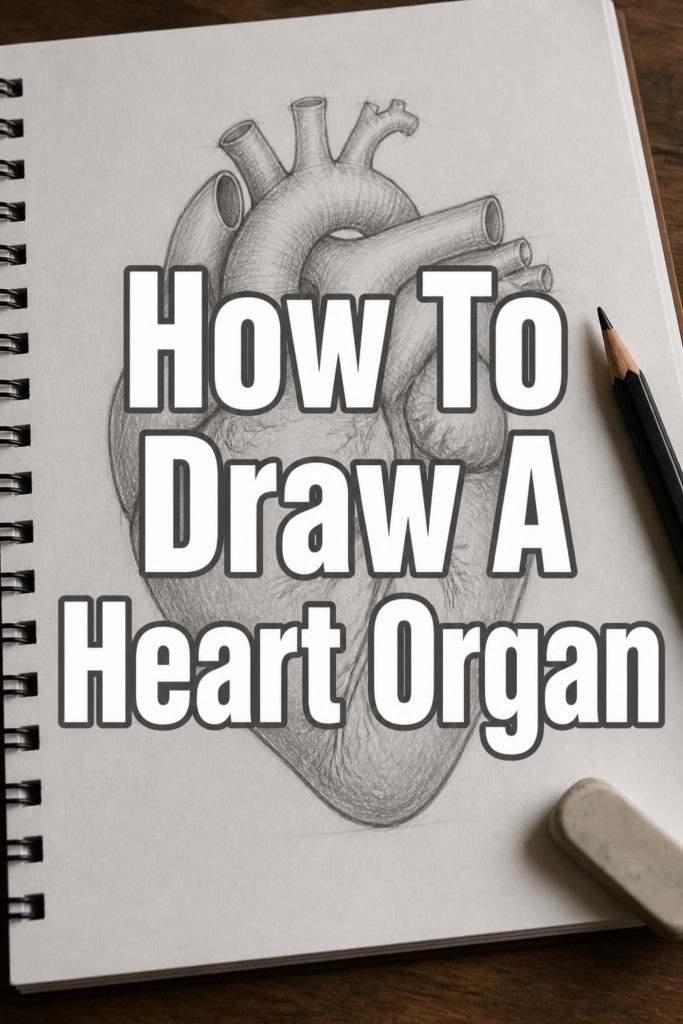
Quick Overview
This guide will walk you through creating a detailed drawing of the human heart. You’ll learn to build its shape from basic forms and add anatomical details.
- Time needed: 45-90 minutes (depending on detail and experience)
- Difficulty: Intermediate
- What you’ll need: Graphite pencils (HB, 2B, 4B), eraser (kneaded and stick), drawing paper, optional: colored pencils or markers
Step-by-Step Instructions
Step 1: Establish the Basic Shape and Size
Begin by lightly sketching the overall form of the heart. Think of it as an inverted pear or a rounded triangle, slightly tilted.
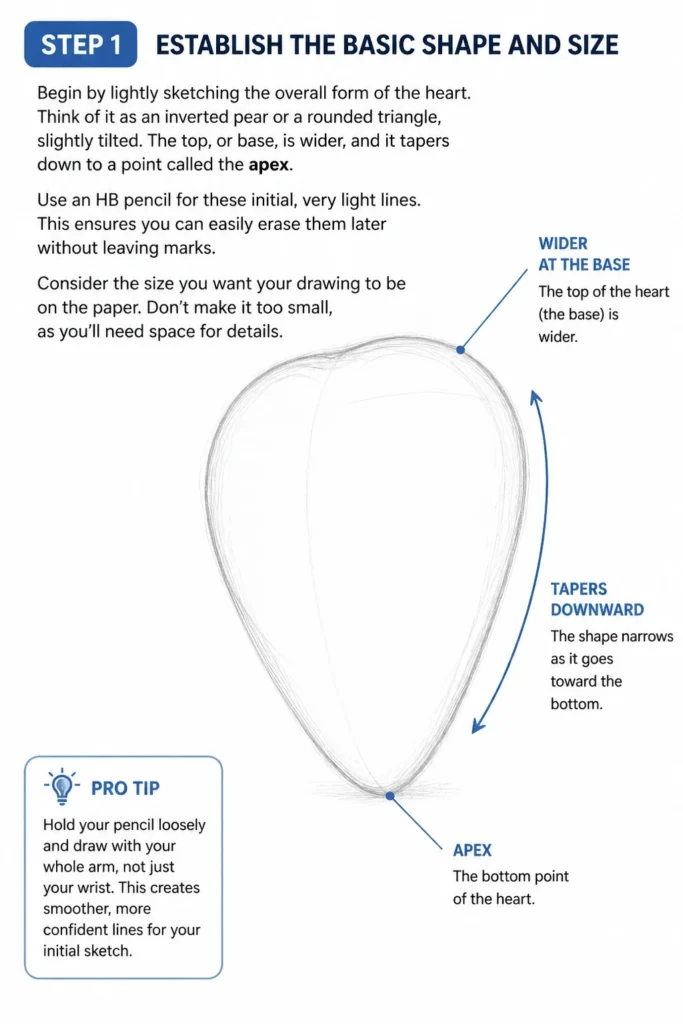
The top, or base, is wider, and it tapers down to a point called the apex. Use an HB pencil for these initial, very light lines. This ensures you can easily erase them later without leaving marks.
Consider the size you want your drawing to be on the paper. Don’t make it too small, as you’ll need space for details.
Pro Tip: Hold your pencil loosely and draw with your whole arm, not just your wrist. This creates smoother, more confident lines for your initial sketch.
Step 2: Outline the Primary Chambers
The heart is divided into four main chambers: two atria at the top and two ventricles below. Lightly draw a central dividing line, the septum, that runs from the top-right to the bottom-left of your pear shape.
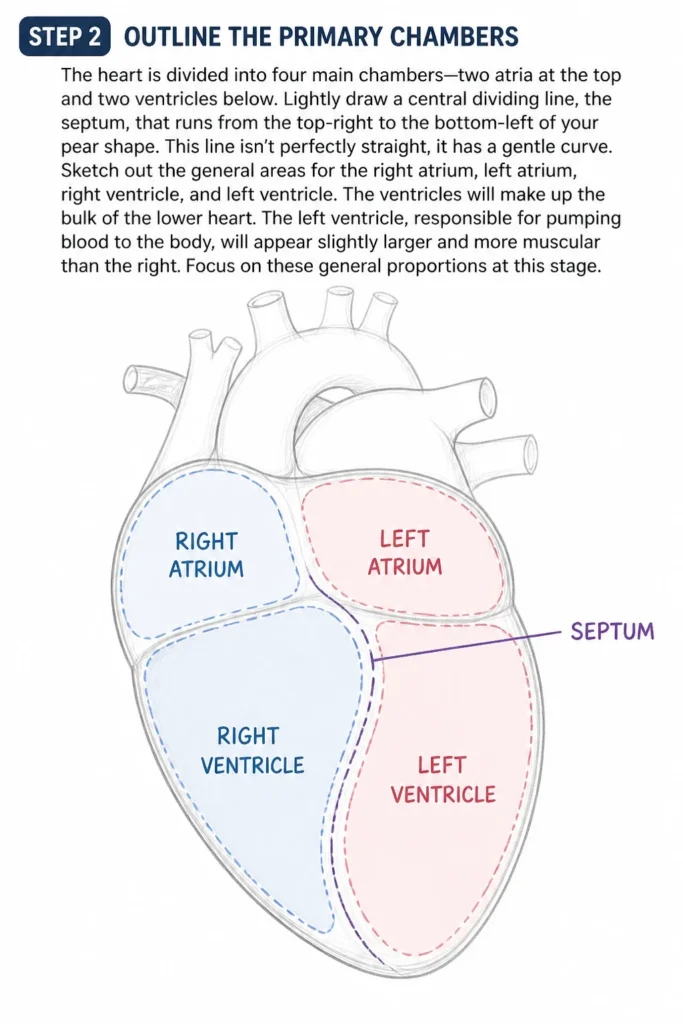
This line isn’t perfectly straight; it has a gentle curve. Sketch out the general areas for the right atrium, left atrium, right ventricle, and left ventricle. The ventricles will make up the bulk of the lower heart.
The left ventricle, responsible for pumping blood to the body, will appear slightly larger and more muscular than the right. Focus on these general proportions at this stage.
Step 3: Sketch the Major Blood Vessels
Now, add the large vessels that connect to the top of the heart. The aorta, the body’s largest artery, arches out from the top-center, curving to the left. It’s a thick, prominent vessel.
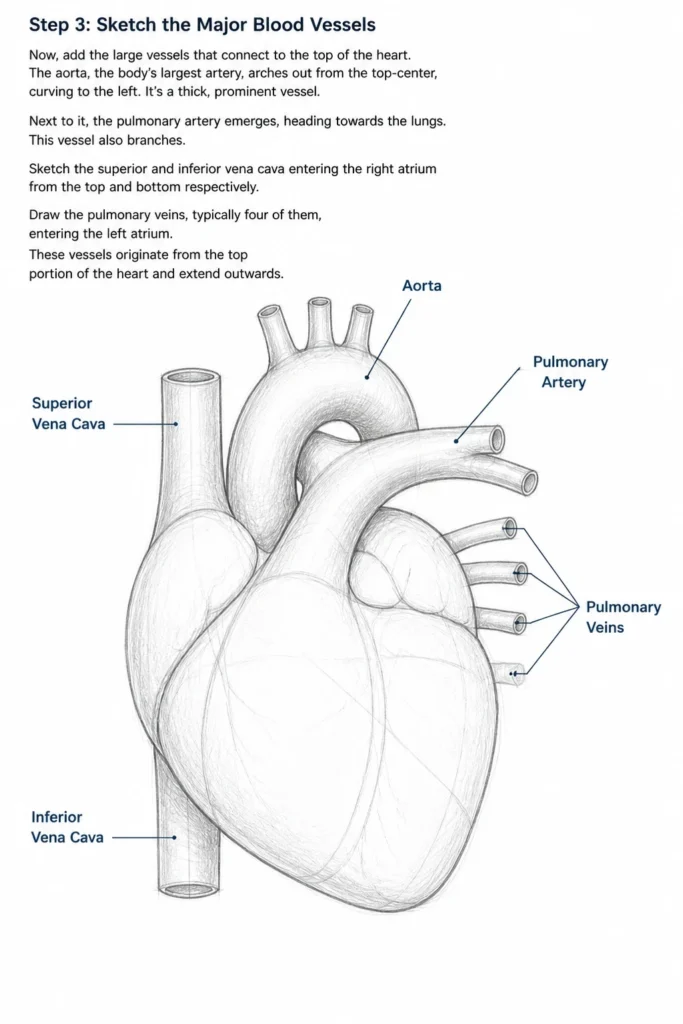
Next to it, the pulmonary artery emerges, heading towards the lungs. This vessel also branches. Sketch the superior and inferior vena cava entering the right atrium from the top and bottom respectively.
Draw the pulmonary veins, typically four of them, entering the left atrium. These vessels originate from the top portion of the heart and extend outwards.
Step 4: Refine the Contours and Apex
Go back over your initial light lines, refining the overall shape of the heart. Pay attention to the subtle curves and bumps that define its muscular structure.

The apex, the pointed bottom of the heart, should be clearly defined but not excessively sharp. The right side of the heart tends to be a bit straighter, while the left side has a more pronounced curve.
Smooth out any jagged lines from your initial sketches. This step is about making your heart look more organic and less geometric.
Step 5: Detail the Coronary Arteries and Veins
The heart has its own circulatory system on its surface, the coronary vessels. These are crucial for its function and add significant realism to your drawing.

Sketch the main coronary artery, which often wraps around the heart’s surface, typically visible in the groove between the atria and ventricles. Draw smaller branches extending from it.
Similarly, add the coronary veins, which often run alongside the arteries. These vessels are important for showing the heart’s intricate vascular network. They add texture and depth to the surface.
Step 6: Indicate Internal Structures (Simplified)
While you won’t draw every valve and muscle fiber, you can suggest some internal structures. Lightly draw the general path of the septum more clearly, showing how it separates the ventricles.

You can also lightly hint at the location of the mitral and tricuspid valves within the heart’s upper chambers. These are simplified indications, not detailed anatomical renderings.
This subtle suggestion helps convey the heart’s internal complexity without getting bogged down in minute details. It adds to the overall understanding of the organ.
Step 7: Begin Shading and Adding Depth
Use your 2B pencil to start adding shadows. The heart is a three-dimensional object, so it will have light and shadow. Imagine a light source coming from one direction, perhaps the top-left.
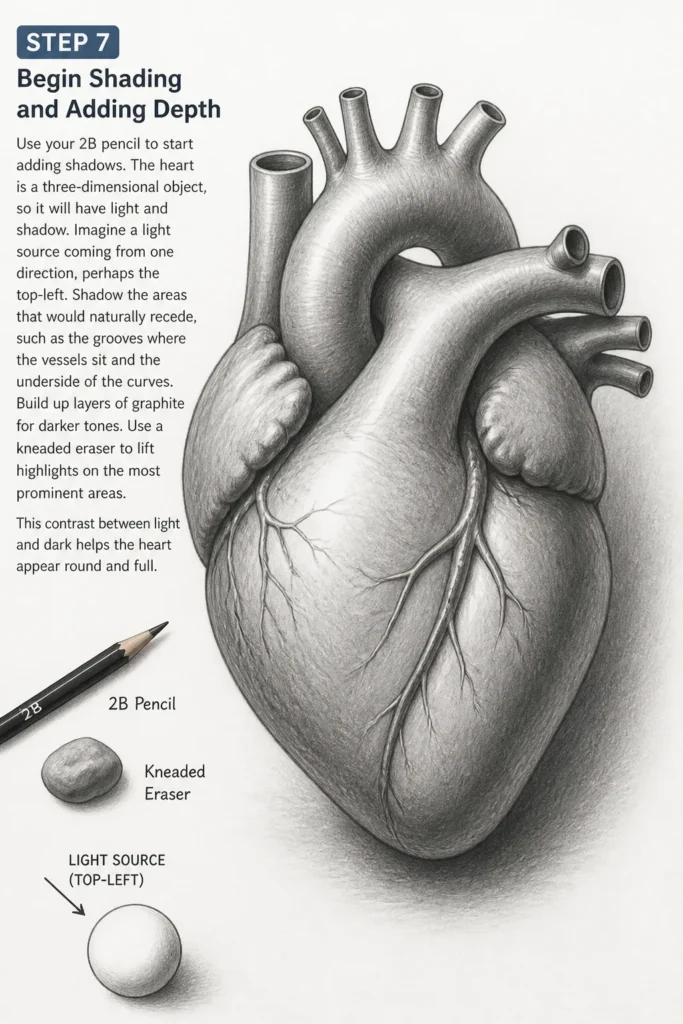
Shadow the areas that would naturally recede, such as the grooves where the vessels sit and the underside of the curves. Build up layers of graphite for darker tones.
Use a kneaded eraser to lift highlights on the most prominent areas. This contrast between light and dark helps the heart appear round and full.
Step 8: Refine Texture and Muscle Definition
The heart is a muscle, and its surface isn’t perfectly smooth. Use your 4B pencil to deepen the darkest shadows and add subtle texture.
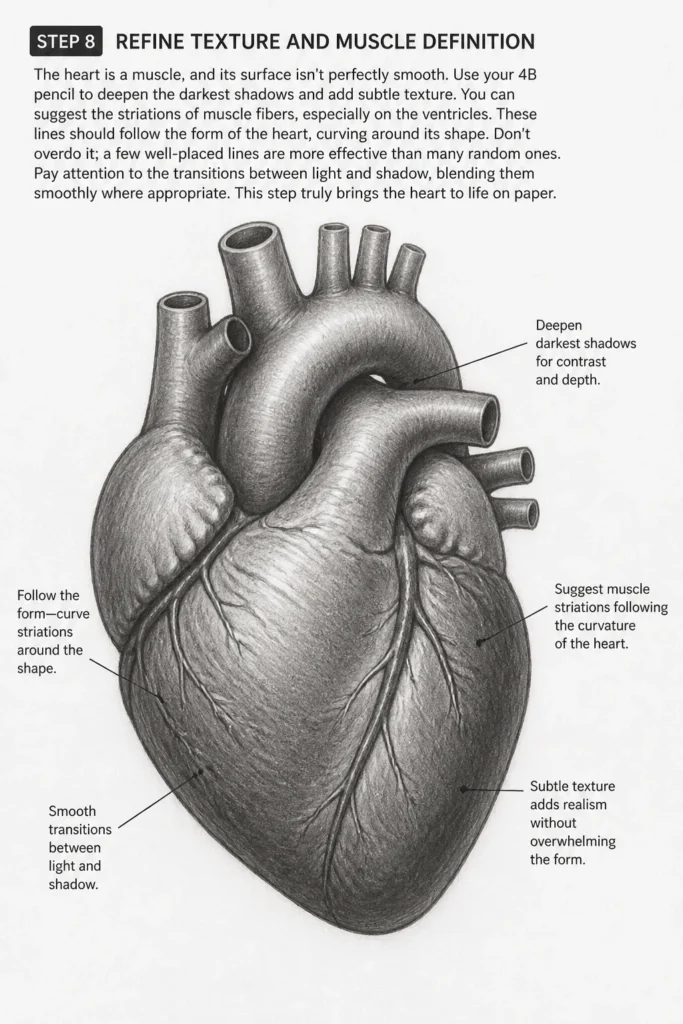
You can suggest the striations of muscle fibers, especially on the ventricles. These lines should follow the form of the heart, curving around its shape. Don’t overdo it; a few well-placed lines are more effective than many random ones.
Pay attention to the transitions between light and shadow, blending them smoothly where appropriate. This step truly brings the heart to life on paper.
Step 9: Finalize Details and Clean Up
Review your entire drawing. Are the proportions correct? Do the vessels connect logically? Use your stick eraser to clean up any stray pencil marks or smudges.
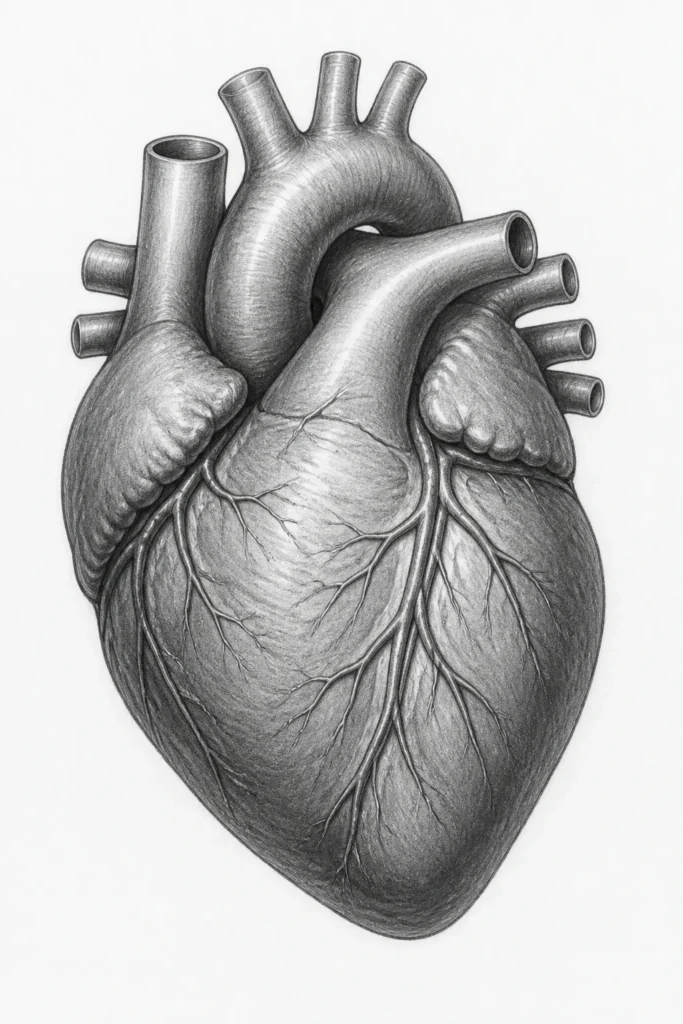
Strengthen any lines that feel too weak. Add final touches of shading to enhance depth and realism. Ensure the apex is well-defined and the overall form feels balanced.
This final stage is about polish and ensuring your drawing communicates the complexity and beauty of the heart organ effectively. It’s where all the small adjustments come together.
Step 10: (Optional) Add Color
If you wish to add color, consider using colored pencils for a more controlled application. Reds and blues are traditional for arteries and veins, representing oxygenated and deoxygenated blood.
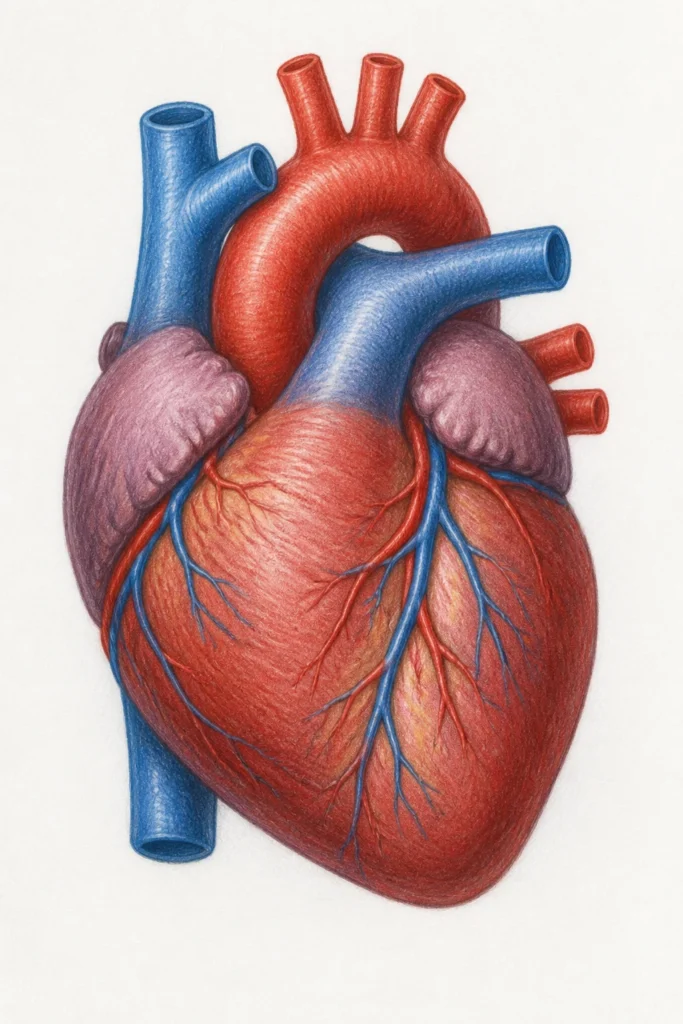
Use a muted red or reddish-brown for the main muscle of the heart. Layer colors lightly to build depth, just as you did with graphite.
This step can significantly enhance the visual impact and anatomical clarity of your heart drawing. Experiment with different hues to find what works best.
Common Mistakes to Avoid
Making the Heart Too Symmetrical
The human heart is not perfectly symmetrical. The left side is generally more muscular and has a slightly different curve than the right. Drawing it as a perfectly balanced shape can make it look unnatural or cartoonish.
Always refer to anatomical references and observe the subtle imbalances. Allow for the natural variations in its form. This approach adds realism and depth to your drawing.
Over-Complicating Vessels Too Early
Trying to draw every tiny vein and artery in the initial stages can lead to frustration and a messy drawing. Begin with the major vessels first, establishing their correct positions and sizes.
Only after the primary structure is solid should you add smaller, secondary branches. This systematic approach ensures clarity and prevents your drawing from becoming overwhelming. Build complexity gradually.
Neglecting Shading and Depth
A common pitfall is drawing only outlines, which results in a flat, two-dimensional image. The heart is a complex, three-dimensional organ. Shading is essential to convey its volume and form.
Focus on establishing a clear light source and applying shadows and highlights accordingly. This creates the illusion of depth and makes your heart appear to pop off the page. Without proper shading, the drawing lacks realism.
Incorrect Apex Placement or Shape
The apex is the pointed bottom of the heart, and its correct depiction is vital for anatomical accuracy. Sometimes artists make it too sharp, too rounded, or place it incorrectly.
The apex typically points towards the left and slightly downward. Ensure it has a natural, rounded point, not an exaggerated sharp one. Its orientation contributes significantly to the overall realism of the heart.
Troubleshooting
My Heart Looks Too Cartoonish or Like a Valentine
If your drawing resembles a stylized valentine heart rather than an anatomical organ, it likely lacks the subtle irregularities and muscular texture of a real heart. Your proportions might be too symmetrical or the curves too smooth.
To fix this, revisit your anatomical references. Pay close attention to the slight asymmetry of the chambers and the more rugged, muscular appearance of the ventricles. Introduce subtle bumps and grooves on the surface. Add more detail to the coronary vessels.
I Can’t Get the Vessels to Connect Correctly
Connecting the major blood vessels logically can be challenging. Often, artists struggle with their points of origin and destination, leading to a confusing jumble.
Simplify your approach. Focus on the three main vessels: the aorta, pulmonary artery, and vena cava. Ensure the aorta arches from the top-center, the pulmonary artery emerges next to it, and the vena cava enters the right atrium. Draw them as distinct, overlapping forms. Use clear, gentle curves for their paths.
It Looks Flat, Not Three-Dimensional
A flat drawing indicates insufficient shading and a lack of understanding of form. The heart is a solid object with volume, and shading is how you communicate this.
Identify your light source. Then, apply darker tones to areas that recede or are in shadow, such as under overlapping vessels or in the grooves between chambers. Use lighter tones and highlights on surfaces facing the light. Blend your shadows smoothly and gradually to create a sense of depth and roundness.
Key Takeaways
- Always start with a light, basic shape, like an inverted pear, before adding details.
- Break down the complex structure into manageable sections: chambers, then major vessels, then surface details.
- Refer to anatomical diagrams frequently to ensure correct proportions and vessel placement.
- Use shading and varying line weight to create depth, volume, and texture, moving beyond simple outlines.
- Practice patience and build your drawing in layers, refining each stage before moving to the next.
- Don’t be afraid to erase and adjust; it’s a natural part of the drawing process.
Frequently Asked Questions
What materials are best for drawing a realistic heart organ?
For a realistic heart drawing, a good set of graphite pencils (HB, 2B, 4B, 6B) offers a range of values for shading and detail. High-quality drawing paper with some tooth will hold the graphite well. A kneaded eraser and a stick eraser are essential for corrections and creating highlights.
How can I make my heart drawing look more realistic?
Realism comes from accurate proportions, detailed surface anatomy, and effective shading. Study real anatomical references closely. Pay attention to the subtle curves, the texture of the muscle, and the branching patterns of the coronary vessels. Master light and shadow to create depth.
Is it okay to simplify some parts of the heart for my drawing?
Absolutely. For most anatomical drawings, simplifying internal structures or very fine details of smaller vessels is perfectly acceptable, especially when starting out. Focus on accurately representing the main chambers, major vessels, and overall form. The goal is clarity and understanding, not always microscopic precision.
How long does it take to master drawing the heart organ?
Mastering any complex subject in drawing takes time and consistent practice. You’ll see improvement with each attempt. Expect to spend several hours practicing to feel comfortable with the basic form and details. Continuous learning and refinement will lead to mastery over weeks or months.
Our Top Recommended Finds
- Strathmore 400 Series Sketch Pad: Excellent all-purpose paper for graphite and charcoal, providing a good surface for blending.
- Faber-Castell Polychromos Colored Pencils: High-quality oil-based pencils that offer vibrant colors and excellent blending for adding realism.
- Staedtler Mars Lumograph Graphite Pencils (Set): A reliable set of varying hardness pencils, perfect for achieving a wide range of tones and details.
Embrace the Art of Anatomy
You’ve just completed a journey into drawing one of the most vital organs in the human body. This process not only hones your artistic skills but also deepens your appreciation for anatomy.
Each line you drew and every shadow you placed contributed to a comprehensive understanding of the heart’s structure. Take pride in your accomplishment, knowing you’ve tackled a challenging subject with dedication.
Now, take your newfound skills and apply them. Try drawing the heart from different angles or integrate it into a larger anatomical study. The world of anatomical art is vast and fascinating, waiting for your creative exploration.