🐱 How To Draw A Cat For Kids
Hey there, future artists!
Do you love cats as much as I do?
I’ve spent countless hours sketching my own fluffy friends, and I’m so excited to show you a super easy way to draw a purr-fect cat today!
Quick Overview
Get ready to create an adorable cat drawing! This guide will take you through each simple step, building your cat from basic shapes to a finished masterpiece. You’ll be amazed at what you can create!
- Time needed: 20-30 minutes (take your time and have fun!)
- Difficulty: Beginner
- What you’ll need: Pencil, paper, eraser, and maybe some crayons or colored pencils for fun!
Step-by-Step Instructions
Step 1: Start with the Head
Let’s begin by drawing the cat’s head. Imagine a yummy donut or a big cookie – that’s the shape we’re going for! Draw a nice, round circle in the middle of your paper.
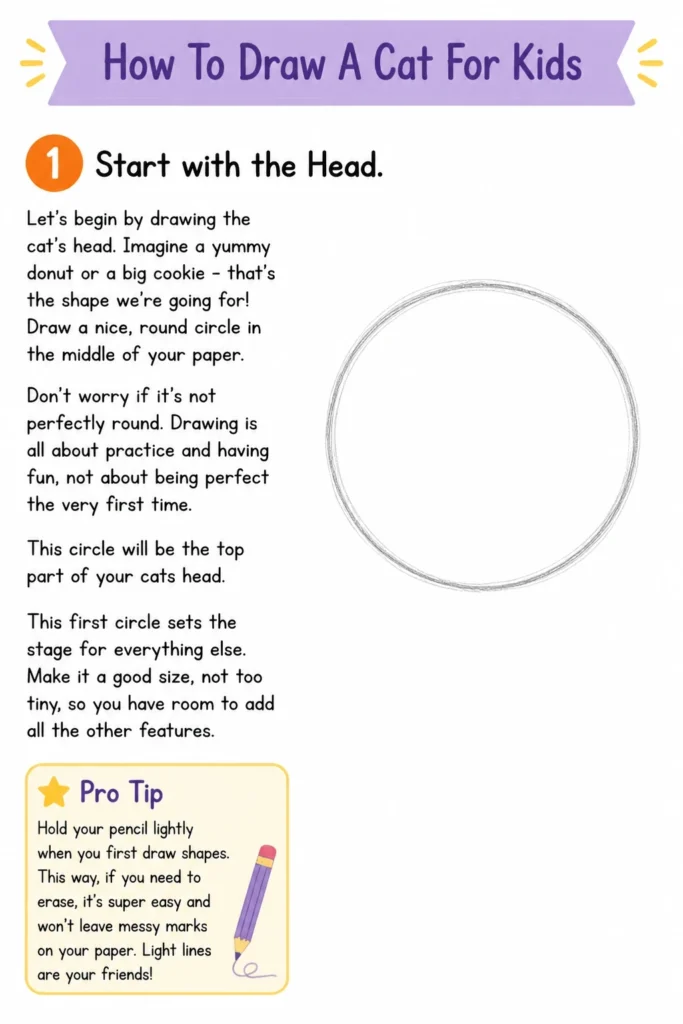
Don’t worry if it’s not perfectly round. Drawing is all about practice and having fun, not about being perfect the very first time. This circle will be the top part of your cat’s head.
This first circle sets the stage for everything else. Make it a good size, not too tiny, so you have room to add all the other features.
Pro Tip: Hold your pencil lightly when you first draw shapes. This way, if you need to erase, it’s super easy and won’t leave messy marks on your paper. Light lines are your friends!
Step 2: Add the Body Oval
Now, let’s give our cat a body! Just below the head circle you just drew, draw a larger oval shape. Think of it like a long, squishy egg.
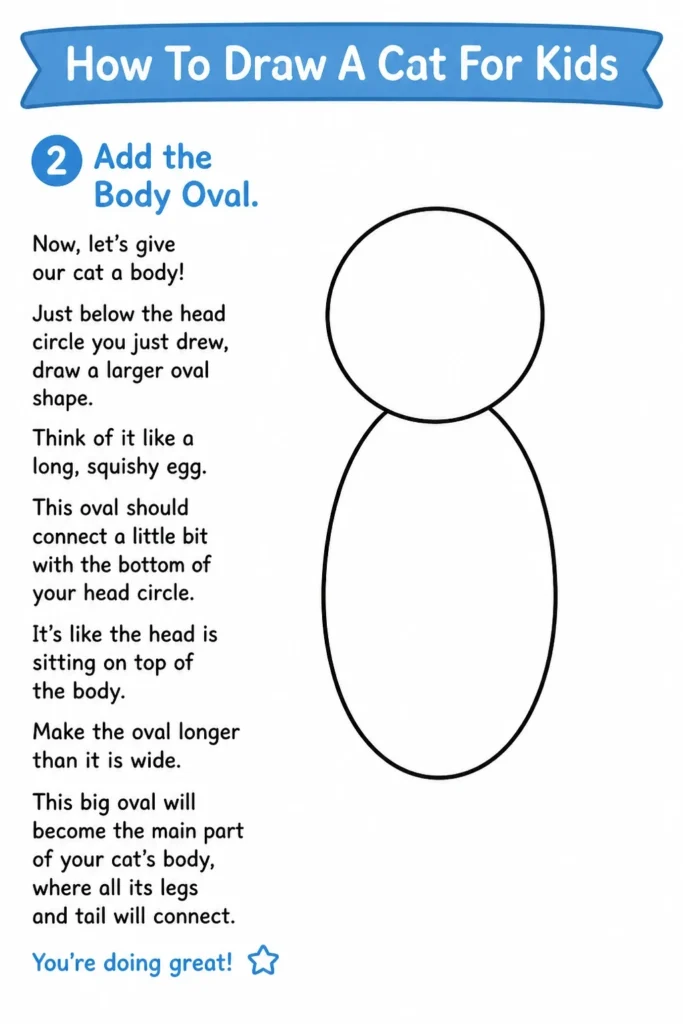
This oval should connect a little bit with the bottom of your head circle. It’s like the head is sitting on top of the body. Make the oval longer than it is wide.
This big oval will become the main part of your cat’s body, where all its legs and tail will connect. You’re doing great!
Step 3: Create the Ears
Cats have super cute, pointy ears! To draw them, go back to the head circle. On the top left and top right sides of the circle, draw two triangles.
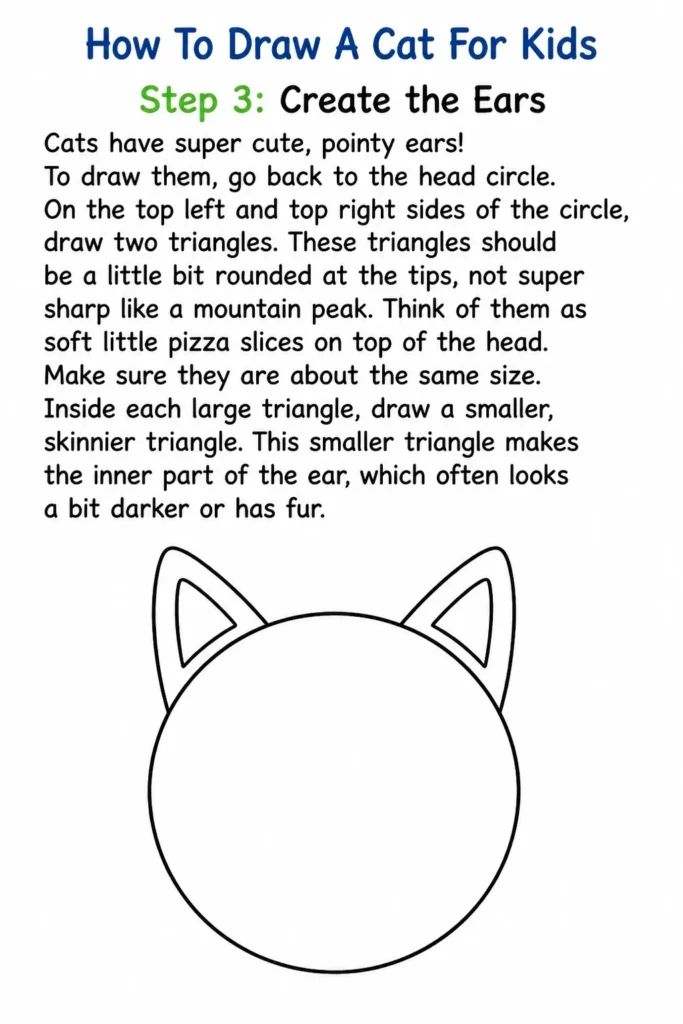
These triangles should be a little bit rounded at the tips, not super sharp like a mountain peak. Think of them as soft little pizza slices on top of the head. Make sure they are about the same size.
Inside each large triangle, draw a smaller, skinnier triangle. This smaller triangle makes the inner part of the ear, which often looks a bit darker or has fur.
Step 4: Draw the Muzzle and Nose
Time for the cat’s adorable face! For the muzzle (the snout area), draw a small, slightly squashed oval or a wide “U” shape in the lower middle part of the head circle.
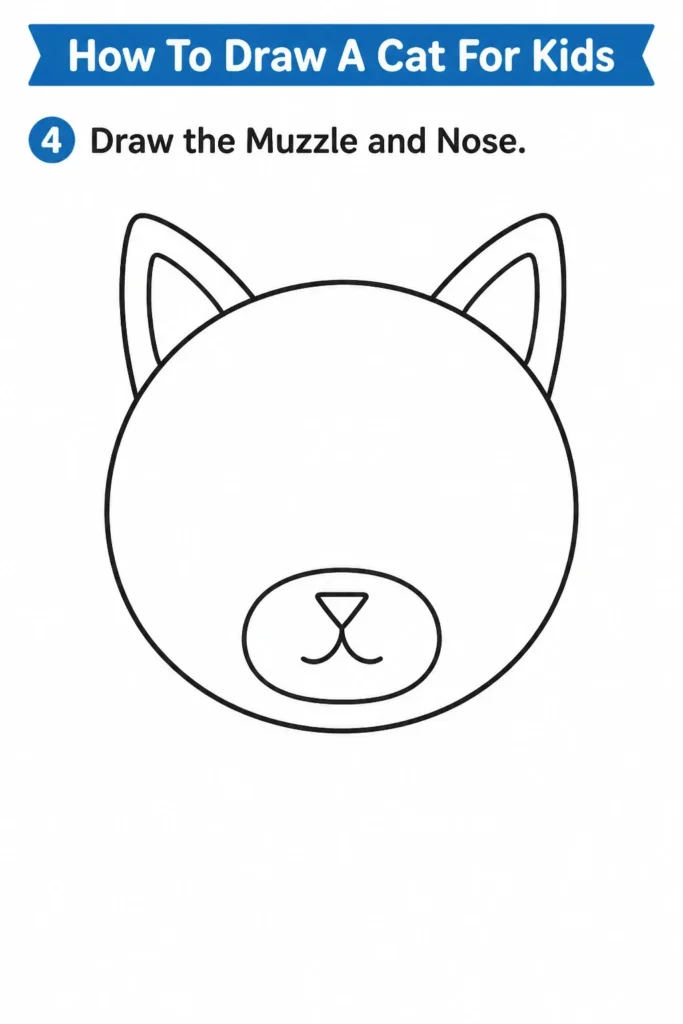
This oval should sit just above where you imagine the chin would be. It creates a little bump for the nose and mouth. Next, draw a small, upside-down triangle right in the middle of that muzzle shape for the nose.
From the bottom point of the nose triangle, draw two tiny curved lines going downwards and outwards. These are the top parts of the cat’s mouth, making it look like a cute little “W” or “Y” shape.
Step 5: Give Your Cat Eyes
Every cat needs sparkling eyes! Draw two almond shapes (like a football or a lemon cut in half lengthwise) above the muzzle and nose you just drew.
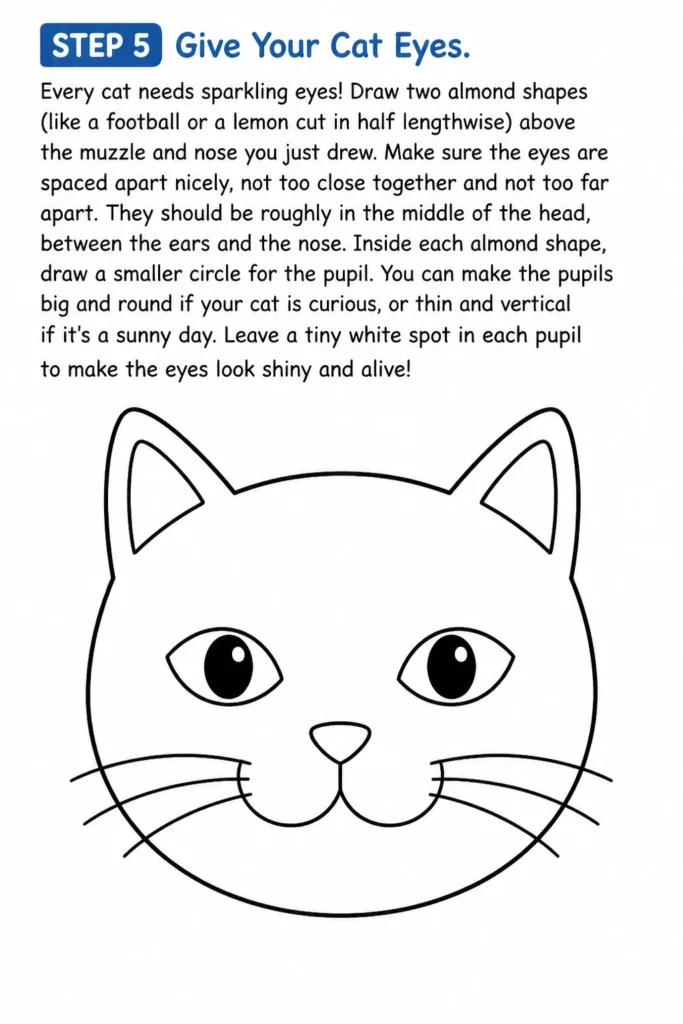
Make sure the eyes are spaced apart nicely, not too close together and not too far apart. They should be roughly in the middle of the head, between the ears and the nose.
Inside each almond shape, draw a smaller circle for the pupil. You can make the pupils big and round if your cat is curious, or thin and vertical if it’s a sunny day. Leave a tiny white spot in each pupil to make the eyes look shiny and alive!
Step 6: Add the Legs and Paws
Now, let’s give our cat some legs to stand on! For the front legs, draw two slightly curved, parallel lines extending downwards from the front part of the body oval.
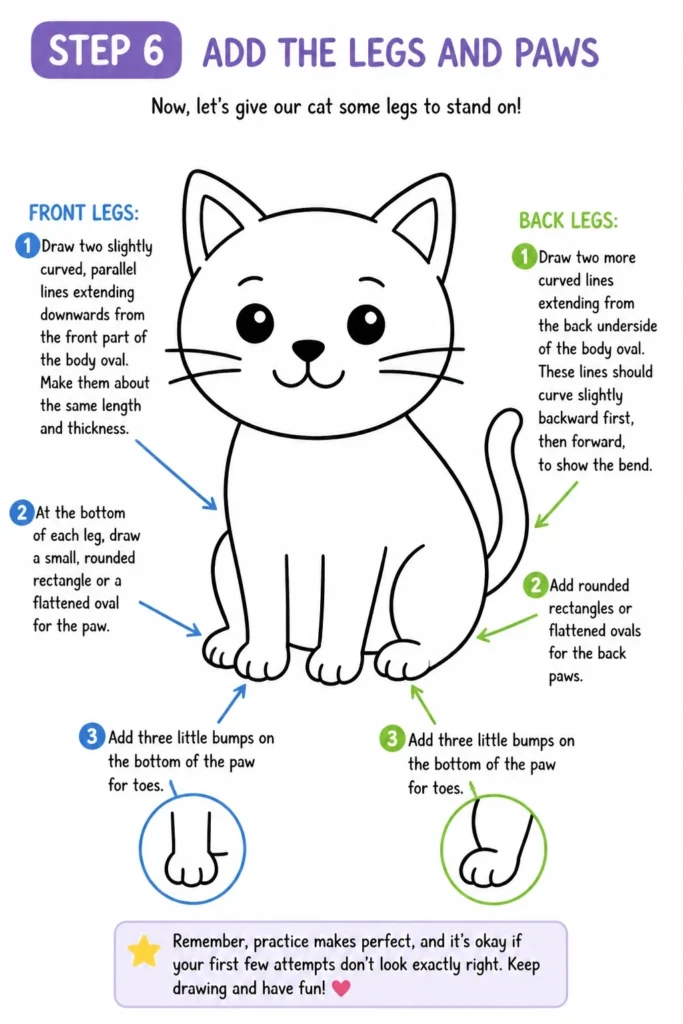
Make them about the same length and thickness. At the bottom of each leg, draw a small, rounded rectangle or a flattened oval for the paw. You can add three little bumps on the bottom of the paw for toes.
For the back legs, these are a bit trickier because they often look bent when a cat is sitting. Draw two more curved lines extending from the back underside of the body oval. These lines should curve slightly backward first, then forward, to show the bend.
Again, add rounded rectangles or flattened ovals for the back paws, complete with little toe bumps. Remember, practice makes perfect, and it’s okay if your first few attempts aren’t exactly right.
Step 7: Draw the Tail
A cat’s tail is full of personality! It can be long, fluffy, curled, or straight. For this cat, let’s draw a nice, curved tail.
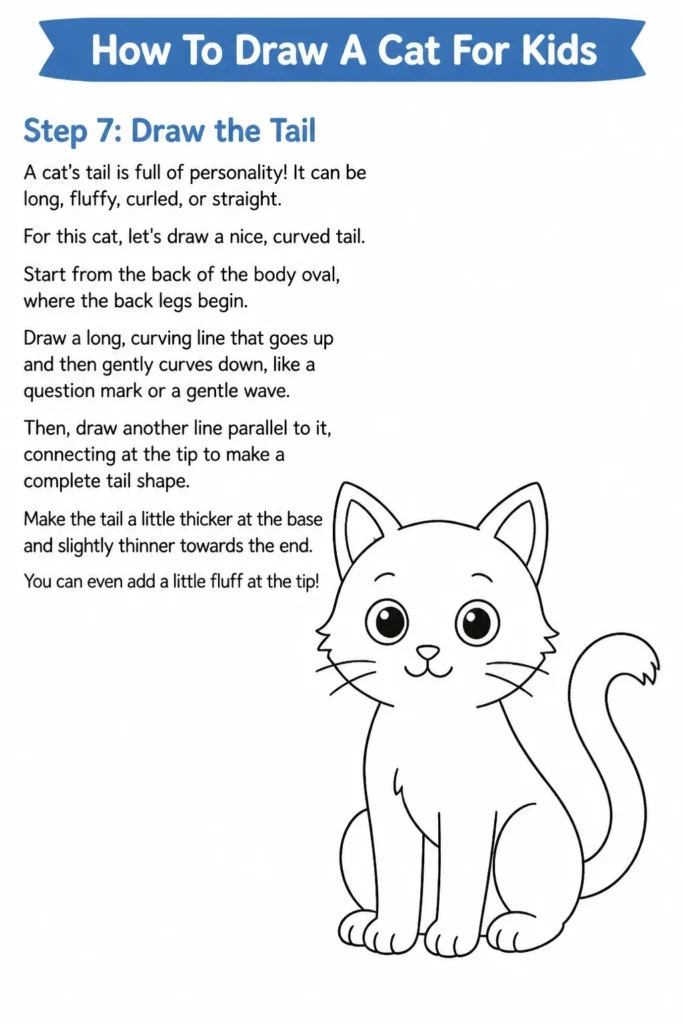
Start from the back of the body oval, where the back legs begin. Draw a long, curving line that goes up and then gently curves down, like a question mark or a gentle wave.
Then, draw another line parallel to it, connecting at the tip to make a complete tail shape. Make the tail a little thicker at the base and slightly thinner towards the end. You can even add a little fluff at the tip!
Step 8: Whiskers and Finishing Touches
Almost done! Cats use their whiskers to feel their way around, and they look super cute. Draw three or four long, gently curved lines coming out from each side of the muzzle.
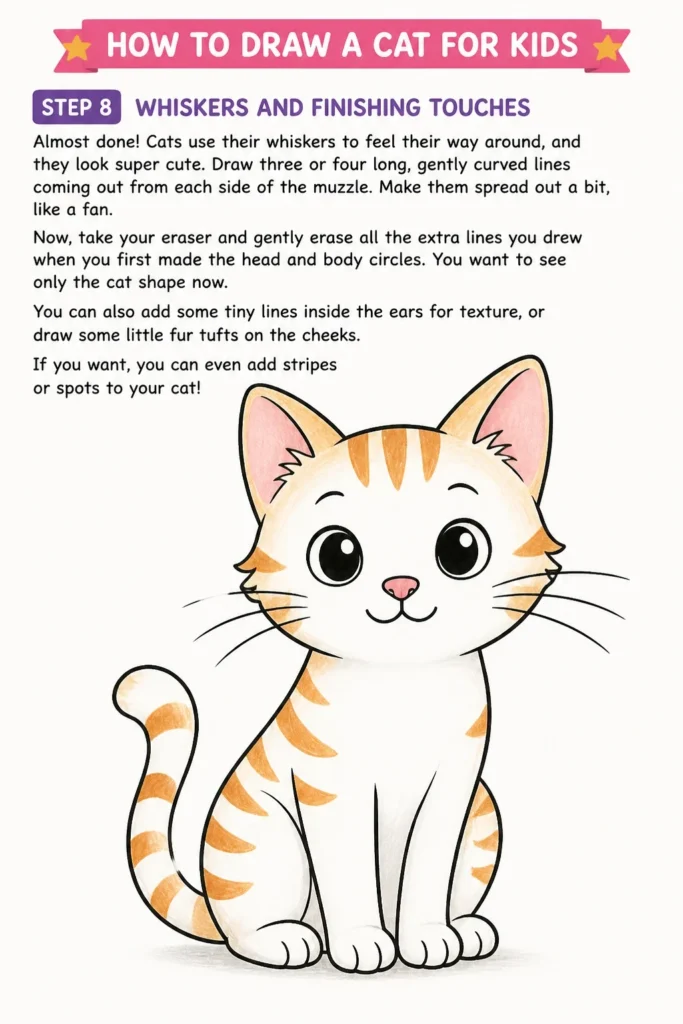
Make them spread out a bit, like a fan. Now, take your eraser and gently erase all the extra lines you drew when you first made the head and body circles. You want to see only the cat shape now.
You can also add some tiny lines inside the ears for texture, or draw some little fur tufts on the cheeks. If you want, you can even add stripes or spots to your cat!
Step 9: Color Your Cat!
This is the most fun part for many artists! Grab your crayons, colored pencils, or markers. What color will your cat be?
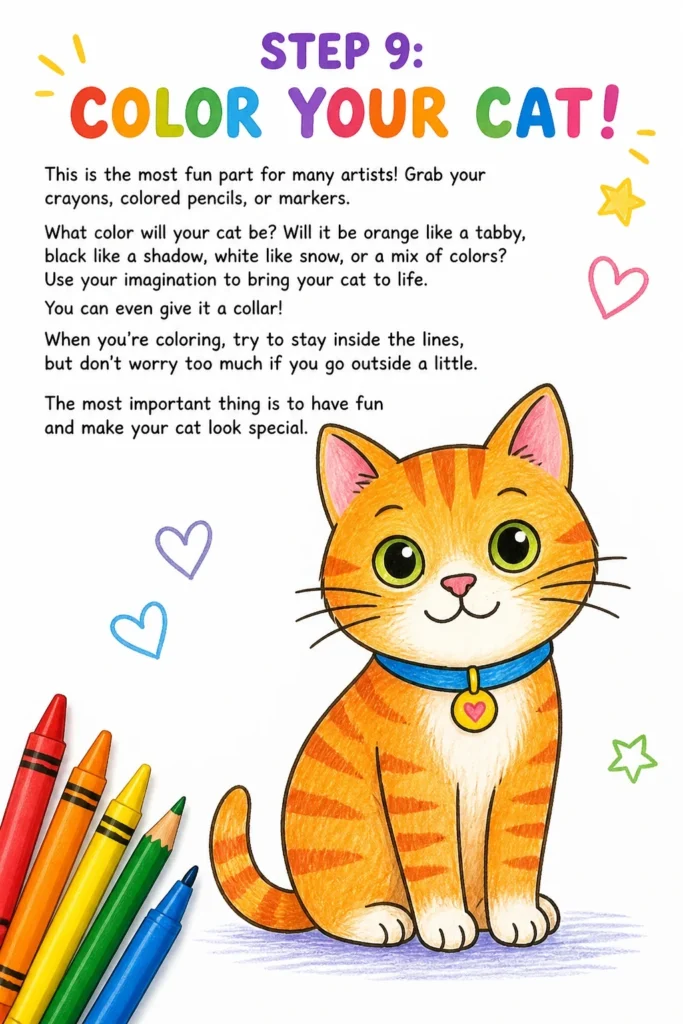
Will it be orange like a tabby, black like a shadow, white like snow, or a mix of colors? Use your imagination to bring your cat to life. You can even give it a collar!
When you’re coloring, try to stay inside the lines, but don’t worry too much if you go outside a little. The most important thing is to have fun and make your cat look special.
Common Mistakes to Avoid
Making the Head Too Small or Too Big
Sometimes, artists draw a head that’s either tiny compared to the body or so huge it looks like a giant balloon! This can make the cat look out of proportion. The head should be a good size, fitting naturally on top of the body. If your head looks too small, you can always make the body smaller, or try drawing the head a bit bigger next time.
Drawing Stiff Legs
Cats are graceful and flexible, so their legs shouldn’t look like straight, rigid sticks. If you draw straight, stiff lines for legs, your cat might look a bit robotic. Remember to add gentle curves to the legs, especially the back ones, to show movement and a natural pose. This makes your cat look much more alive and cuddly.
Forgetting to Erase Guide Lines
When you first draw the circles and ovals, those are “guide lines” to help you. If you forget to erase them at the end, your cat drawing can look messy or unfinished. Always remember to gently erase those initial helper lines once you have your final cat outline. It makes your drawing look much cleaner and more professional.
Not Adding Whiskers
Whiskers are a super important feature for cats! If you forget to add whiskers, your cat might look a little bare or less cat-like. Whiskers add a lot of charm and personality, so remember to draw those delicate lines fanning out from the muzzle. They really complete the cat’s face.
Troubleshooting
My Cat Looks Flat
If your cat drawing looks a bit flat, it might be because you’re drawing everything with very straight lines. To make your cat look more rounded and three-dimensional, try using more curved lines. Think about the natural curves of a cat’s body, head, and legs.
Also, when you color, you can add a little bit of shading. Using a slightly darker shade of your chosen color on one side of the cat, or under its chin, can make it pop out from the paper. This creates the illusion of depth.
My Cat’s Eyes Are Uneven
It’s common for eyes to look a little uneven at first! Don’t worry, this happens to everyone. To fix this, first, make sure you’re looking at your drawing straight on, not from an angle. Then, you can use your eraser to lightly adjust one of the eyes until they look more balanced.
A good trick is to draw a very light horizontal line across the face where you want the eyes to be. This helps you place them at the same height. Practice makes them perfectly placed!
The Tail Doesn’t Look Right
A tail can be tricky because it needs to have a natural flow. If your tail looks too short, too straight, or just odd, try erasing it and drawing it again with a more sweeping, curved motion. Think of how a real cat’s tail moves – it’s never perfectly stiff.
You can also look at pictures of real cats to see how their tails curve and interact with their bodies. Remember to make it thicker at the base and gently taper towards the tip for a more natural look.
Key Takeaways
- Start with simple shapes like circles and ovals to build your cat’s head and body.
- Use light pencil lines at first so you can easily erase and adjust your drawing.
- Pay attention to details like ears, whiskers, and paws to make your cat unique.
- Don’t be afraid to use an eraser; it’s a tool for improvement, not a sign of mistakes.
- Practice makes you better; the more you draw, the more confident you’ll become.
- Most importantly, have fun and let your creativity shine through in your artwork!
Frequently Asked Questions
What if my circles aren’t perfect?
That’s totally fine! No one draws a perfect circle freehand, not even grown-up artists. The important thing is that your circles are a guide. As you add more details and erase lines, those initial circles won’t even be visible. Just aim for a roundish shape and keep going!
Can I draw a cat in a different pose?
Absolutely! Once you’re comfortable drawing a sitting cat, you can experiment. Try drawing the body oval in a different position, or curve the back more. You could even draw a cat stretching or sleeping. Start with basic shapes for the new pose and build from there.
How do I make my cat look fluffy?
To make your cat look fluffy, instead of drawing straight lines for the outline of its body, use short, jagged, or wavy lines. This makes it look like soft fur is sticking out. When coloring, you can use short strokes of your crayon or pencil in the direction the fur would grow.
What if I make a mistake?
Mistakes are just opportunities to learn! Every artist makes them. If you draw something you don’t like, simply use your eraser. It’s there to help you fix things and try again. Don’t get discouraged; just keep practicing and enjoying the process.
Our Top Recommended Finds
- Good Quality Sketchbook: A sketchbook with nice, smooth paper makes drawing more enjoyable and keeps all your amazing creations in one place.
- Eraser Set: Having a few different erasers, like a soft kneaded eraser and a classic rubber eraser, can help you clean up your drawings perfectly.
- Colored Pencils or Crayons: A big box of colorful pencils or crayons lets you bring your cat drawings to life with all sorts of fun colors and patterns.
Your Cat Adventure Awaits!
You’ve just learned how to draw an amazing cat, step by step! How cool is that? Every time you pick up a pencil, you’re building a new skill and letting your imagination soar.
Don’t stop here! Why not try drawing a whole family of cats, or maybe a cat playing with a ball of yarn? You could even try drawing your own pet if you have one!
The best way to become a super artist is to keep practicing and always have fun with your drawings. So grab your pencil, find some paper, and start creating more purr-fect pals today!