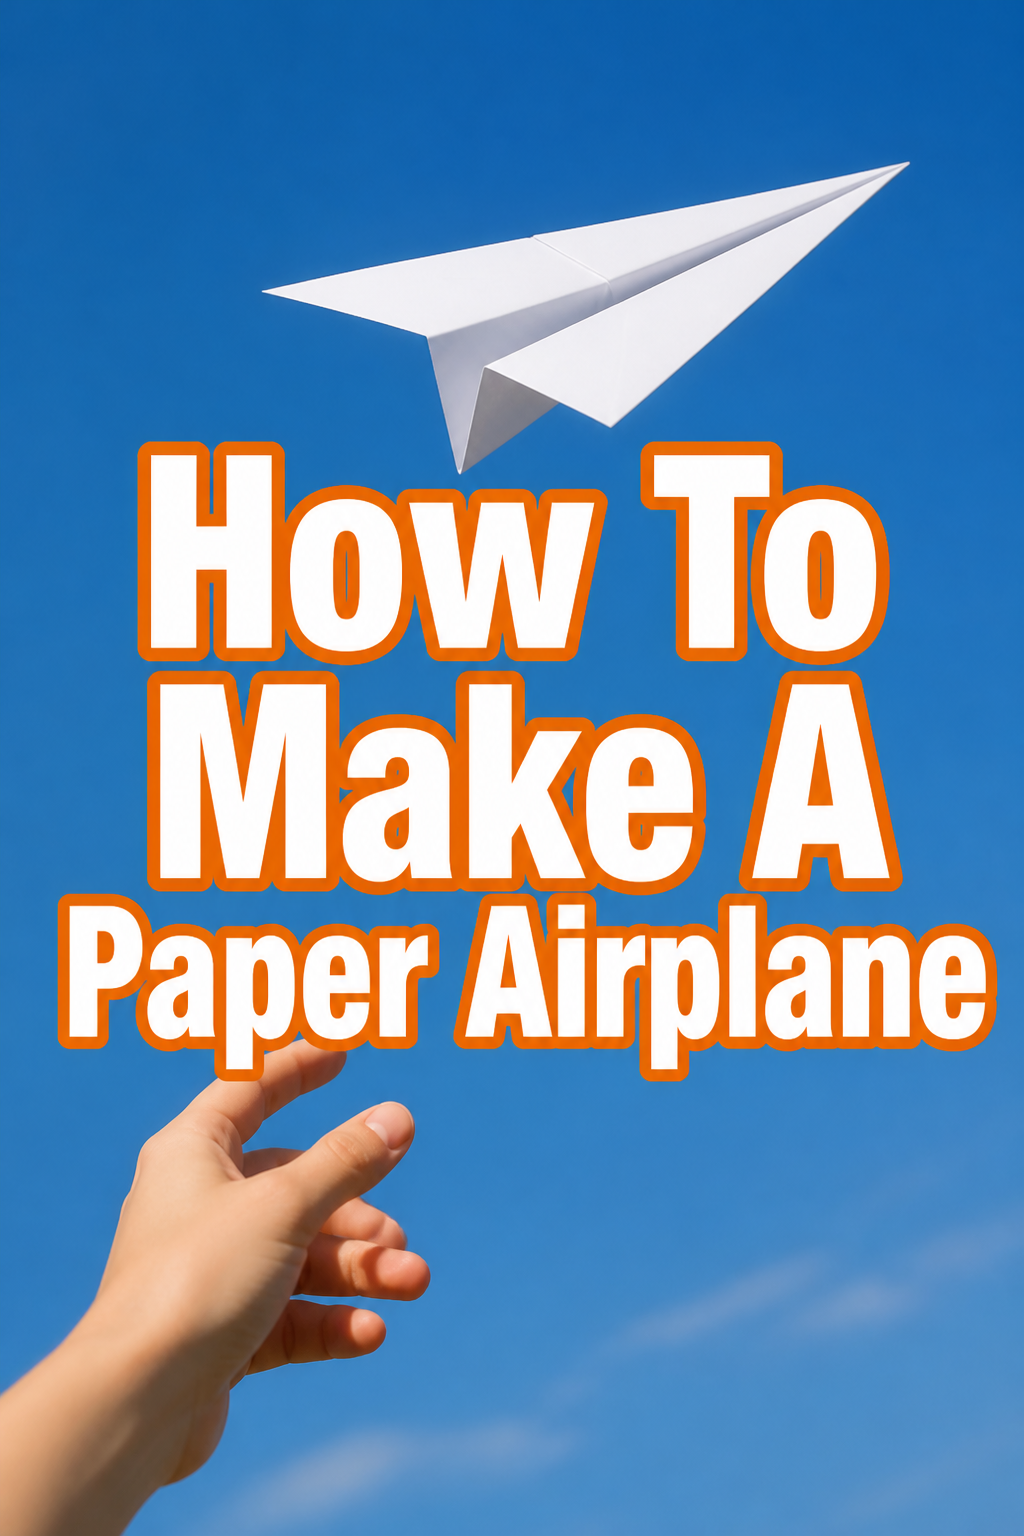
✈️ How To Make A Paper Airplane
Remember the simple thrill of watching a paper airplane soar across a room?
It’s a timeless activity that brings a sense of wonder and accomplishment, connecting generations through a shared, creative joy.
I’ve folded countless designs since childhood, experimenting with angles and paper types, and I’m excited to share the secrets to crafting a truly impressive flyer with you.
Quick Overview
In this guide, you will learn to construct a classic paper airplane that demonstrates excellent flight characteristics, from a smooth glide to impressive distance.
You’ll gain practical folding skills and an understanding of basic aerodynamics, turning a simple sheet of paper into a flying marvel.
- Time needed: 10-15 minutes
- Difficulty: Beginner
- What you’ll need: One standard sheet of printer paper (A4 or Letter size)
Step-by-Step Instructions
Step 1: Prepare Your Paper
Begin with a single sheet of standard printer paper. The most common sizes are A4 or Letter, both work perfectly for this design.
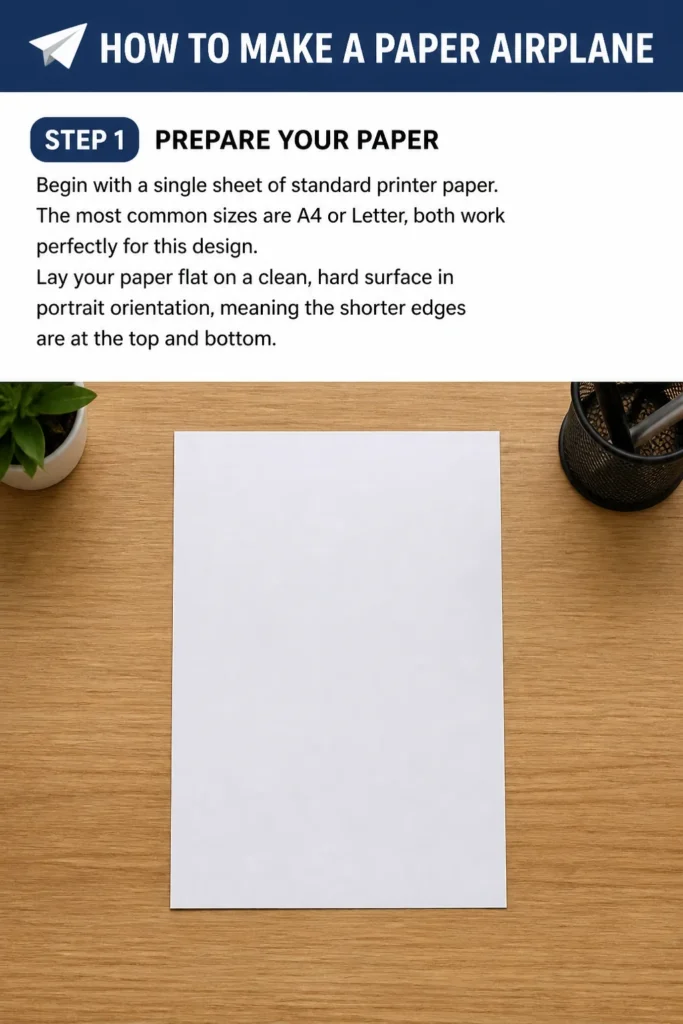
Lay your paper flat on a clean, hard surface in portrait orientation, meaning the shorter edges are at the top and bottom.
Step 2: Fold the Center Crease
Carefully fold the paper in half lengthwise, bringing the top short edge down to meet the bottom short edge.
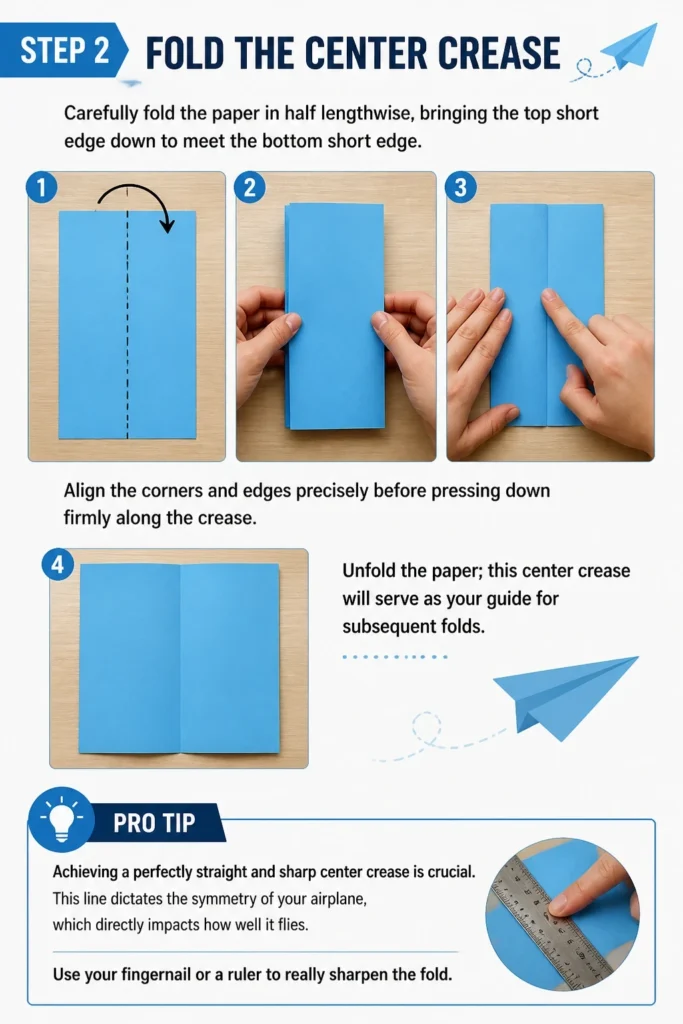
Align the corners and edges precisely before pressing down firmly along the crease. Unfold the paper; this center crease will serve as your guide for subsequent folds.
Pro Tip: Achieving a perfectly straight and sharp center crease is crucial. This line dictates the symmetry of your airplane, which directly impacts how well it flies. Use your fingernail or a ruler to really sharpen the fold.
Step 3: Create the Initial Nose Points
Take the top-right corner of the paper and fold it inward so its edge aligns perfectly with the center crease you just made.
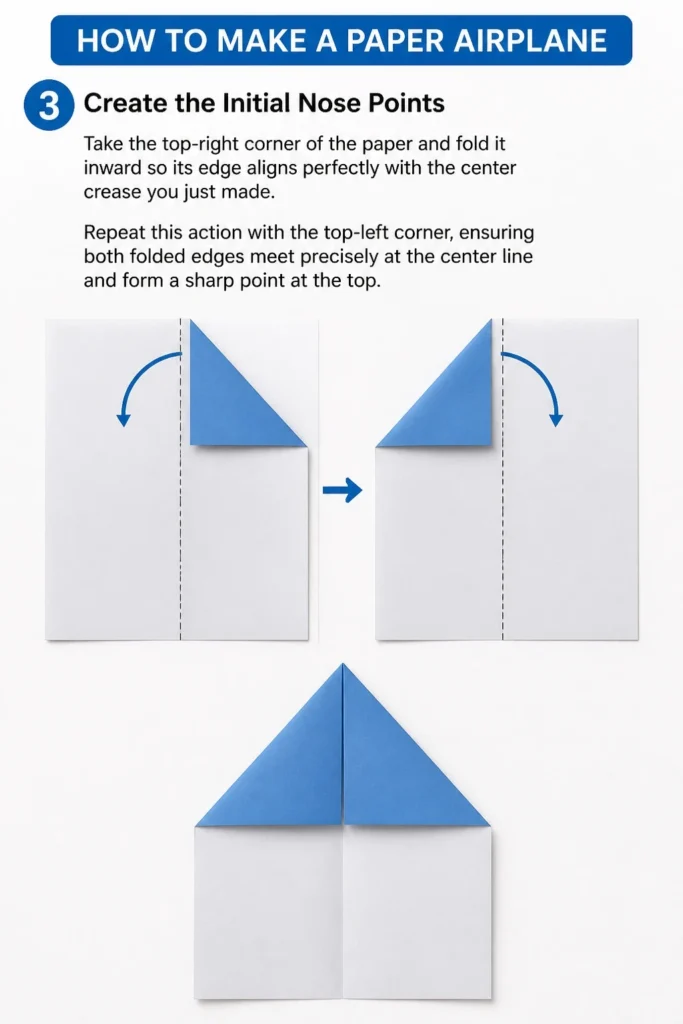
Repeat this action with the top-left corner, ensuring both folded edges meet precisely at the center line and form a sharp point at the top.
Step 4: Fold Down the Top Section
Now, take the entire triangular section you just created at the top and fold it downwards.
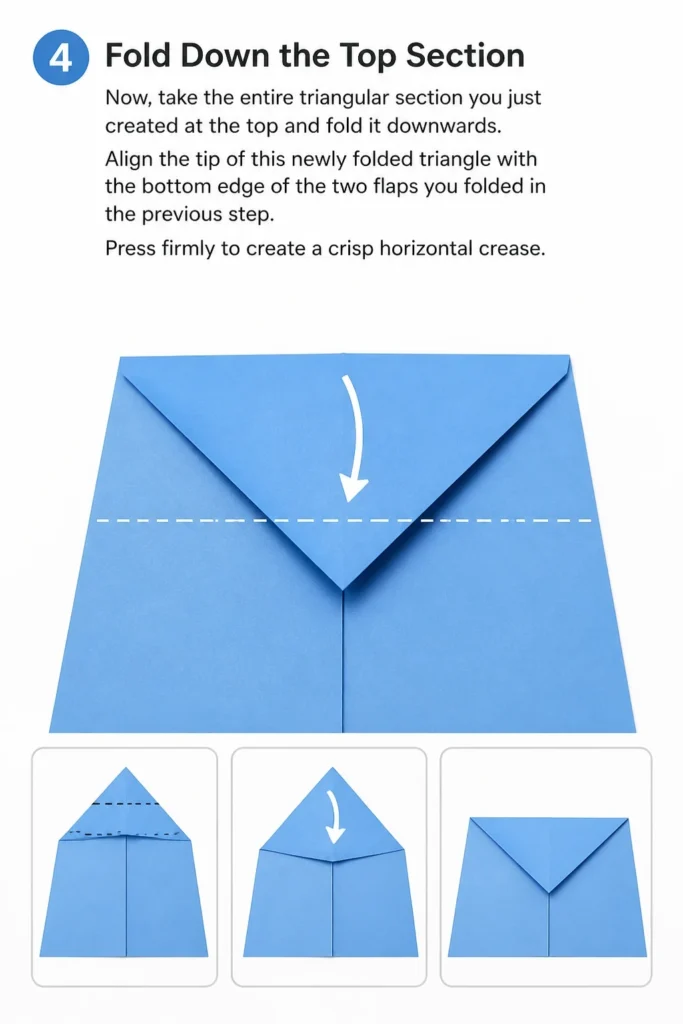
Align the tip of this newly folded triangle with the bottom edge of the two flaps you folded in the previous step. Press firmly to create a crisp horizontal crease.
Step 5: Form the Secondary Nose Folds
You now have a horizontal flap across the top of your paper. Take the top-right corner of this flap and fold it inward towards the center crease once more.
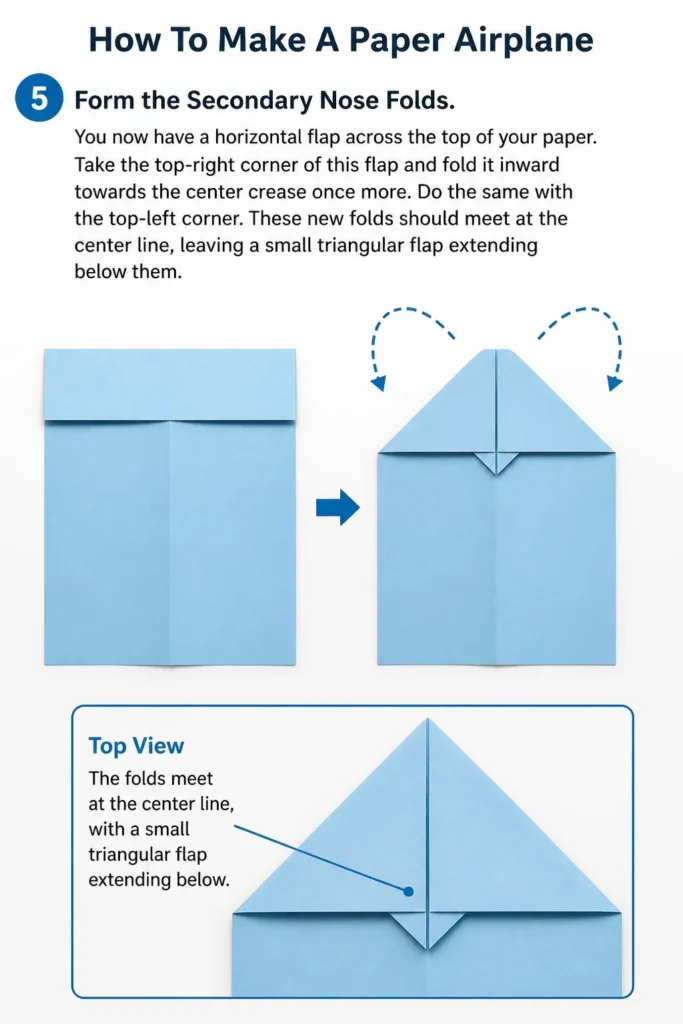
Do the same with the top-left corner. These new folds should meet at the center line, leaving a small triangular flap extending below them.
Step 6: Secure the Nose
Take the small triangular flap that is now exposed at the bottom of your most recent folds.
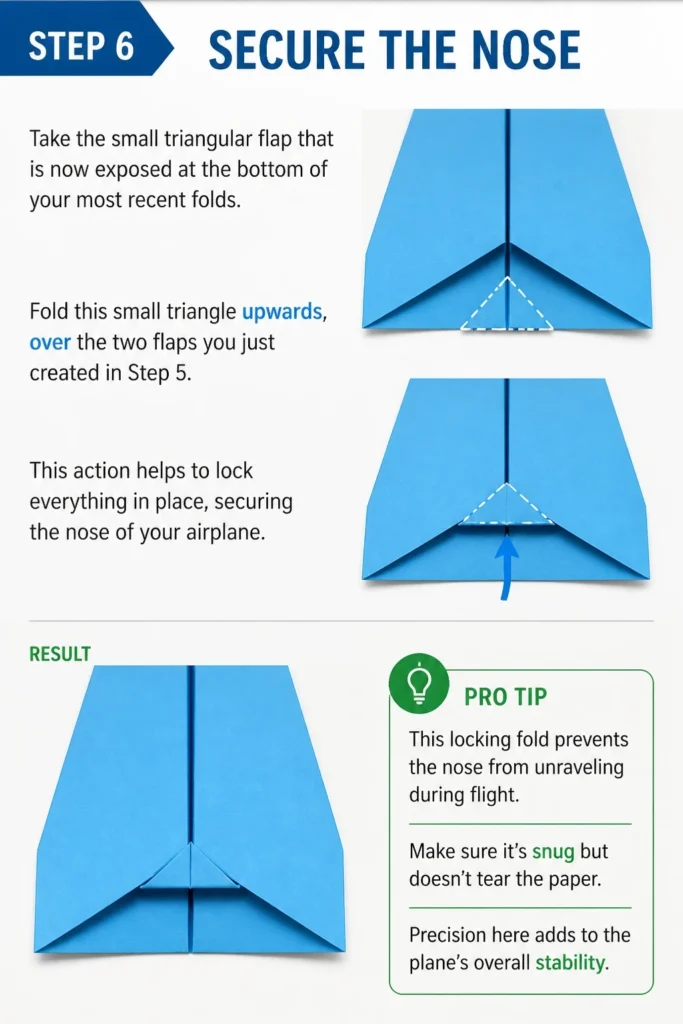
Fold this small triangle upwards, over the two flaps you just created in Step 5. This action helps to lock everything in place, securing the nose of your airplane.
Pro Tip: This locking fold prevents the nose from unraveling during flight. Make sure it’s snug but doesn’t tear the paper. Precision here adds to the plane’s overall stability.
Step 7: Fold the Airplane in Half
Carefully fold your entire paper airplane in half along the original center crease you made in Step 2.
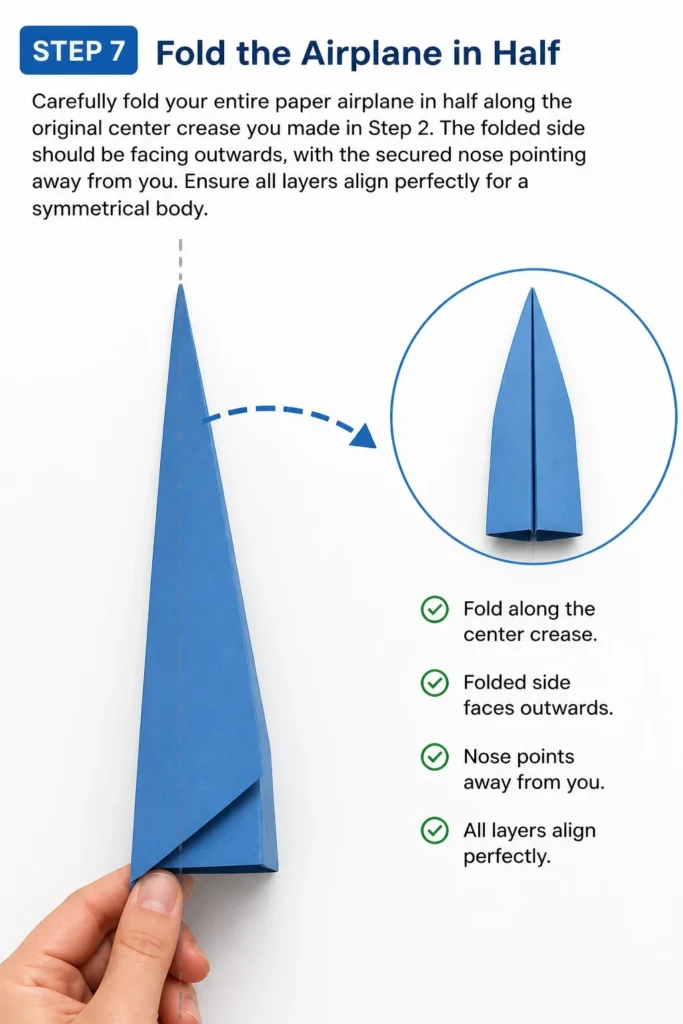
The folded side should be facing outwards, with the secured nose pointing away from you. Ensure all layers align perfectly for a symmetrical body.
Step 8: Shape the Wings
With the airplane folded in half, take the top edge of one side and fold it downwards to create a wing.
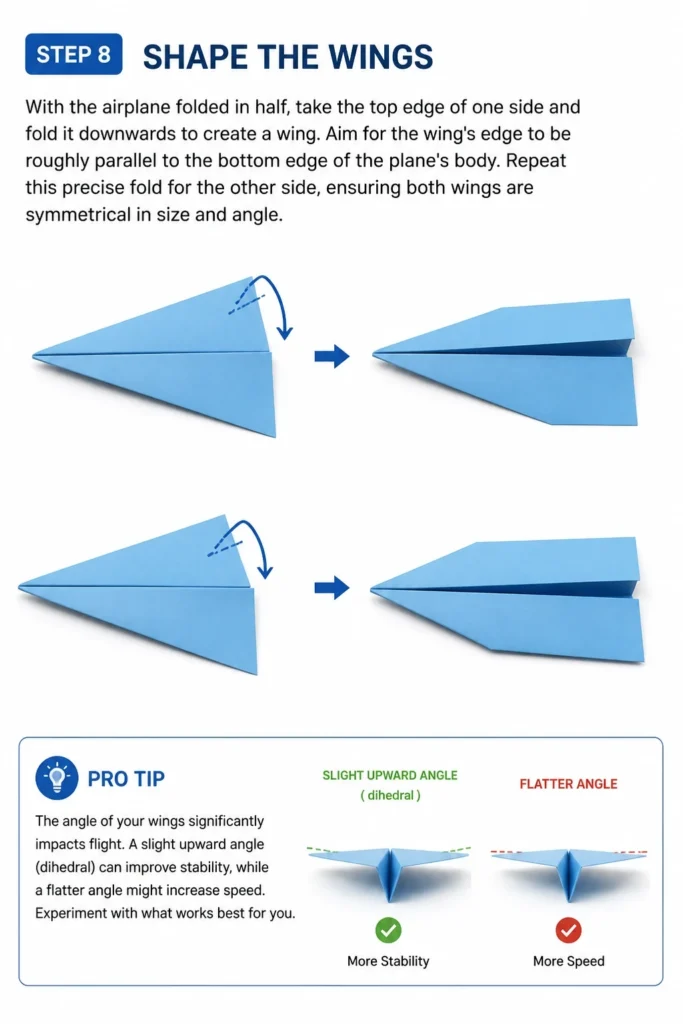
Aim for the wing’s edge to be roughly parallel to the bottom edge of the plane’s body. Repeat this precise fold for the other side, ensuring both wings are symmetrical in size and angle.
Pro Tip: The angle of your wings significantly impacts flight. A slight upward angle (dihedral) can improve stability, while a flatter angle might increase speed. Experiment with what works best for you.
Step 9: Refine and Test
Your paper airplane is nearly complete! Gently unfold the wings so they are perpendicular to the body, forming a classic airplane shape.
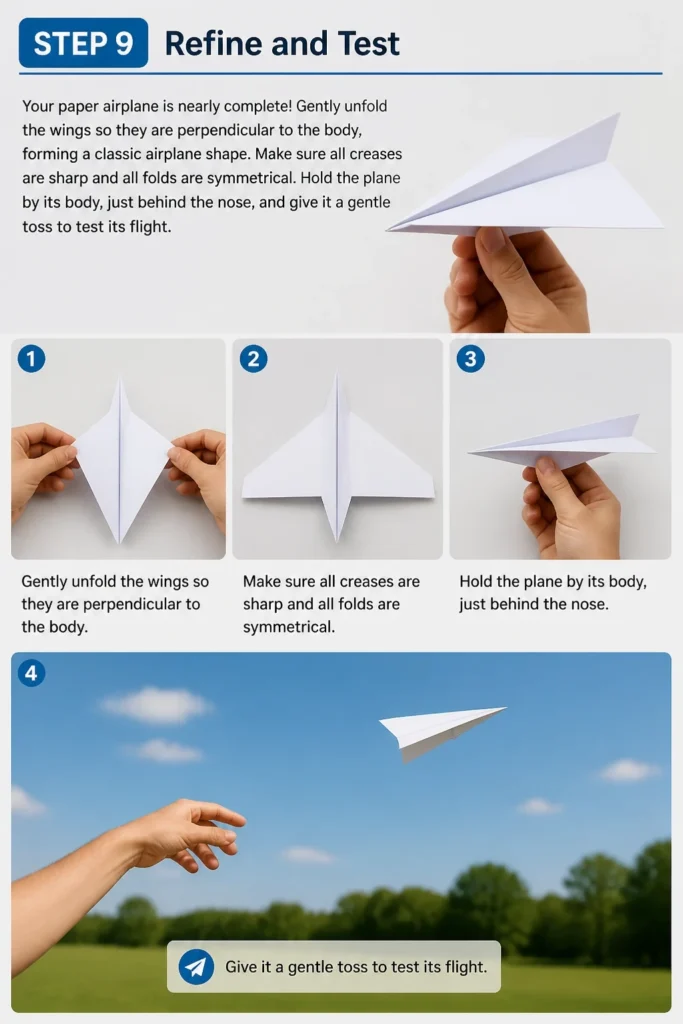
Make sure all creases are sharp and all folds are symmetrical. Hold the plane by its body, just behind the nose, and give it a gentle toss to test its flight.
Common Mistakes to Avoid
Uneven Folds
One of the most frequent errors is not making symmetrical folds. If one wing is larger or angled differently than the other, your airplane will consistently veer to one side or spin uncontrollably.
Always take your time to align edges and corners perfectly before pressing down on a crease. Precision in folding directly translates to stability in flight.
Lack of Sharp Creases
Flimsy, rounded creases weaken the structural integrity of your paper airplane. This can cause parts to unfold in mid-air or the plane to lose its intended aerodynamic shape.
After each fold, run your fingernail or a blunt object firmly along the crease to ensure it’s as sharp and defined as possible. Sharp creases create a more rigid and predictable flyer.
Using the Wrong Paper Type
While most standard printer paper works well, using paper that is too thin (like tissue paper) will result in a flimsy plane that struggles to hold its shape.
Conversely, paper that is too thick (like cardstock) will make precise folding difficult and add excessive weight, reducing flight distance. Stick to standard 20-24 lb printer paper for optimal results.
Rushing the Process
Trying to fold quickly often leads to misalignments and sloppy creases. Paper airplane making is a craft that rewards patience and attention to detail.
Take your time with each step, carefully aligning and creasing. Enjoy the process, and your efforts will be rewarded with a better-flying airplane.
Troubleshooting
Airplane Dives Immediately
If your paper airplane consistently plunges nose-first shortly after launch, it usually indicates that the nose is too heavy or the wings aren’t generating enough lift.
Try making the wings slightly wider by folding them down a bit more, or gently curve the very back edge of the wings upward (creating a slight elevator effect) to help lift the nose.
Airplane Tumbles or Spins
A tumbling or spinning airplane is almost always a sign of asymmetry. One wing might be folded differently, or the body itself might be slightly twisted.
Carefully inspect all your folds, ensuring they are identical on both sides. Straighten any bends in the body and ensure the wings are perfectly level with each other when viewed from the front.
Airplane Doesn’t Fly Far
If your plane seems to just drop out of the air without much forward momentum, it could be due to several factors. Insufficient launch power is one, but more often it’s an issue with the plane’s aerodynamics.
Ensure your creases are sharp and the overall shape is sleek. Sometimes, a tiny upward curl on the back edges of the wings can improve glide, or a very slight ‘v’ shape in the wings (dihedral) can increase stability and range.
Key Takeaways
- Symmetry is paramount for a stable and predictable flight path.
- Sharp, precise creases create a strong, aerodynamic structure.
- Standard printer paper offers the best balance of weight and foldability.
- Small adjustments to wing angles can dramatically alter flight characteristics.
- Practice and patience are key to improving your paper airplane crafting skills.
- Experimentation with launch power and angle will help you find the sweet spot.
Frequently Asked Questions
What’s the best paper for a paper airplane?
Standard 20-24 lb copier or printer paper is generally considered ideal. It’s strong enough to hold creases well but light enough for good flight. Avoid overly thick or thin papers.
How can I make my paper airplane fly further?
To maximize distance, focus on perfect symmetry, sharp creases, and a smooth, aerodynamic design. A gentle, level launch with good forward momentum is often more effective than a hard throw upwards.
Why does my paper airplane always turn left or right?
Consistent turning indicates an imbalance. One wing is likely slightly heavier, larger, or angled differently than the other. Re-examine your folds closely and ensure perfect symmetry in the wings and body.
Can kids make these?
Absolutely! This classic design is very beginner-friendly and suitable for most children, especially with a little guidance for the more precise folds. It’s a fantastic activity for developing fine motor skills and understanding basic physics.
Our Top Recommended Finds
- Ream of Standard Printer Paper: Perfect for endless practice and experimentation without worrying about running out.
- Ruler or Bone Folder: Useful for achieving exceptionally sharp and straight creases, taking your folding precision to the next level.
- A Book on Advanced Paper Airplane Designs: Once you’ve mastered the basics, explore more complex folds and learn about different aerodynamic principles.
Ready to Master the Skies?
You now have all the knowledge and steps needed to craft your very own high-flying paper airplane.
This simple act of folding can be incredibly rewarding, offering a tangible result of your patience and precision.
Grab a sheet of paper and start folding today, then take your creation outside and watch it glide. Who knows, this might be the start of a new, aerodynamic hobby!